 |
|
This page describes how to set up the Dialogue System with Azuline Studios' Realistic FPS Prefab.
Realistic FPS Prefab copyright © Azuline Studios.
At this point you can jump to the Example Scenes if you'd like to get a preview of how the integration works before continuing to set up your own scene.
Once you've imported the packages and fixed the Input Manager, follow these steps to set up your scene:
The Disable Gameplay In Conversations menu items in Realistic FPS Prefab Setup Part 2 adds components to the player that disable player control during conversations.
If you want to control the camera during conversations and cutscene sequences, control the FPSPlayer GameObject. The camera and visible body will follow it as described below:
Visible Body
If your player uses a visible body, the integration will also configure the player to disable the Visible Body component and play the idle animation when a conversation starts. The body will follow the FPSPlayer's position at the offset it has when the conversation starts.
Camera Kick
The integration will disable the Camera Kick component during conversations. The camera will follow the FPSPlayer's position at the offset it has when the conversation starts.
During conversations, you will usually want to disable NPC AI on the NPC that the player is talking to. Otherwise the NPC could wander away or get into a fight while the player is trying to converse.
To do this, add a Pause AI On Conversation component to the NPC.
Note that other NPCs are not paused. This only applies to the NPC involved in the conversation. You may want to make sure this NPC is placed away from danger so enemies don't interrupt the conversation.
To make an NPC break off conversation if it gets hurt, you must edit the Realistic FPS Prefab script CharacterDamage.cs. Make these two changes:
At some point, you may want to activate another NPC during a conversation. For example, in a conversation with a mob boss, the player accepts a quest to escort the boss's son from jail to home. The son GameObject was previously inactive. If you use the SetActive() sequencer command, the son's AI component will fail to initialize. This is because it looks for certain active RFPS components on the player GameObject. But these components are inactive during conversations. Here are two solutions to this issue:
Use these steps to make NPCs' positions and living/dead states persistent.
CharacterDamage.cs script in two places. On line 7 (after public class CharacterDamage : MonoBehaviour {) add: The Dialogue System On Pick Up Item script can be attached to any Pickup object. (When configuring Pickup objects, remember to set the tag to Usable and the layer to Ragdoll/Pickups.)
When the player picks up the object, this script will perform various actions. You can use it to advance quests, show gameplay alerts, run Lua code, play sequences, and send messages (for example, send an "OnUse" message to a traditional Dialogue System trigger). If you want to remove the object from the scene when it's picked up, tick Destroy.
If you configure this component to send "OnUse" to its own GameObject, you can cleanly integrate RFPS's interaction system with the Dialogue System's trigger system. For example, you can add a Conversation Trigger to a GameObject and set the trigger event to "OnUse". Then add a Dialogue System On Pick Up Item to the same GameObject and configure it to send "OnUse" to itself.
You can use the Save System to save without having to write any scripts.
If you want saved games to record the state of objects in the game, you must add persistent data components such as Position Saver and Destructible Saver. See the Save System documentation for more details.
To record the player's position and rotation, inspect the FPS Lua Bridge on FPS Player and tick Save Position.
To use multiple scenes:
The FPS Lua Bridge synchronizes data between the Realistic FPS Prefab player and the Dialogue System's Lua environment. It automatically synchronizes before and after conversations, and you can synchronize manually using SyncFPSToLua() and SyncLuaToFPS(). It also registers some Lua functions that you can use in conversations, conditions, and Lua Triggers.
The bridge uses the following values in the Lua environment:
| Lua value | Description |
|---|---|
Actor["Player"].hitPoints | Current hit points. |
Actor["Player"].maximumHitPoints | Maximum hit points. |
Actor["Player"].hungerPoints | Current hunger points. |
Actor["Player"].thirstPoints | Current thirst points. |
Actor["Player"].invulnerable | Current invulnerability state (true or false). |
Actor["Player"].currentWeaponIndex | Index of currently-equipped weapon (0=unarmed, 1=knife, etc.). |
Variable["(weaponname)"] | A Boolean (true or false) indicating whether the player has the named weapon. |
Variable["(weaponname)_Ammo"] | An integer indicating how much ammo the player has for the named weapon. |
To check if the player has a shotgun:
Variable["Shotgun"] == true
To take the shotgun away from the player:
Variable["Shotgun"] = false
To completely heal the player:
Actor["Player"].hitPoints = Actor["Player"].maximumHitPoints
The bridge also hides the HUD during conversations if you tick Hide Hud In Conversations.
Add the Sync Lua To FPS On Load Level component to the Dialogue Manager if the player will move between scenes, including appearing in a gameplay scene from a menu scene.
The bridge adds these four Lua functions:
GetRfpsFaction(subject)
Given a subject name (a string that matches a GameObject name in the scene), this function returns a number indicating the subject's faction:
| Value | Faction |
|---|---|
| 1 | Friendly to player |
| 2 | Hostile to player (Alien) |
| 3 | Hostile to all other factions (Zombie) |
If no GameObject matches the subject name, this function returns 1.
Example: You can set a dialogue entry's Conditions field to the value below to only use that entry if "Sad Robot" is friendly:
GetRfpsFaction("Sad Robot") == 1SetRfpsFaction(subject, faction)
Given a subject name (a string that matches a GameObject name in the scene), sets the subject's faction. The faction values are listed in the table above. Example: You can set a dialogue entry's Script field to the value below to make "Sad Robot" hostile:
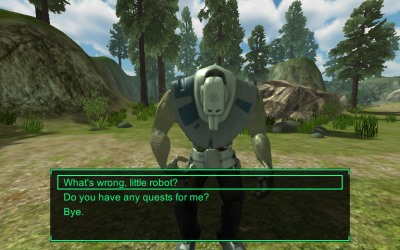
SetRfpsFaction("Sad Robot", 2)The "Sad Robot" conversation runs a quest to get a shotgun for the sad robot. It manages the quest, and also checks whether Variable["Shotgun"] == true. If it's true, it offers the player the option of giving the shotgun to the sad robot. If the player gives the shotgun to the sad robot, the conversation runs the script Variable["Shotgun"] = false to remove the shotgun from the player's inventory.
After giving the sad robot a shotgun, you can choose a dialogue entry that changes its faction to aggressive. This uses the SetRfpsFaction() Lua function.
The "Happy Robot" conversation tests giving and taking weapons and ammo, and reporting health.
If you enter the back of the house, you'll trigger the "Kill 4 Zombies" quest. This uses a Quest Trigger component (although the newer equivalent is Dialogue System Trigger) to start the quest. Each zombie's OnDie() event invokes a Dialogue System Trigger that increments the kill counter and then invokes another Dialogue System Trigger that checks the status of the quest.
Don't use Increment On Destroy with RFPS NPCs because they don't disappear right away. Their dead rigidbodies remain active for several seconds.