 |
|
The Dialogue System includes a cutscene sequencer that you can use in conversations and anywhere else you want to run a cutscene.
Quick Links
In the Dialogue System, each line of dialogue can be tied to a cutscene sequence – for example, to play animations, audio files, and/or move the camera. This sequence is specified in the dialogue entry’s Sequence field, or in the Dialogue Manager’s Default Sequence if the dialogue entry’s Sequence field is blank.
When running a conversation, the Dialogue System will display the dialogue entry’s dialogue text for the duration of the sequence. If your sequence runs for 5 seconds, for example, the dialogue text will be displayed as a subtitle for 5 seconds.
Cutscene sequences are defined in simple text-based commands, making them very compact and quick to add as you write dialogue, even with external authoring programs such as Chat Mapper and articy:draft. A large library of sequencer commands is already included, and you can easily add your own. The complete list of built-in sequencer commands is in Sequencer Command Reference.
In most cases, you don't need to type in the commands manually if you don't want to. See Point-and-Click Sequencer Wizard.
If you don't want to specify your sequences in text strings, you can use an interactive editor such as Unity Timeline and simply run the timeline using the provided Timeline() sequencer command.
The format of a sequencer command may look intimidating at first, but don't worry! It boils down to a couple very simple patterns. You'll get the hang of it very quickly.
The general format of a sequencer command is:
[required] command ( [parameters] ) [@seconds]
or:
[required] command ( [parameters] ) [@Message(message)]
(The square brackets around parts such as required mean it's optional.)
You can also add this optional part to the end:
->Message(endmessage)
You can combine "@Message" and "->Message", too, such as:
AudioWait(DingDong)@Message(PressedDoorbell)->Message(AnswerDoor)
Use a semicolon ( ; ) to separate commands. Sequences can span multiple lines.
| Part | Description |
|---|---|
required | Optional keyword specifying that the command must run even if the player cancels the sequence by pressing the Cancel Subtitle input defined in the Dialogue Manager's Input Settings or clicks the continue button before the command has reached its time to run. Note: Never use required in front of the Continue() sequencer command. |
| command | Command to play (e.g., "Camera" in Camera(Closeup)). |
| parameters | Parameters for the command (e.g,. "Closeup" in Camera(Closeup)). |
@seconds | Optional time at which to play the command; otherwise it plays immediately. |
@Message(message) | Message to wait for before playing the command; otherwise it plays immediately. |
->Message(endmessage) | Message to send to the sequencer when the command completes. |
Technical note: ->Message normally sends the message as soon as the command completes. If you want to delay the message until LateUpdate (e.g., after animation updates), see Sequencer Messages in Late Update.
The following keywords are available as parameters in dialogue entries:
| Keyword | Description |
|---|---|
speaker | The actor in the current dialogue entry, or the assigned speaker in a non-conversation sequence. |
listener | The conversant in the current dialogue entry, or the assigned listener in a non-conversation sequence. |
speakerportrait | The Portrait Image used by the current speaker. |
listenerportrait | The Portrait Image used by the current listener. |
actor:actorname | The GameObject associated with a Dialogue Actor set to the actor specified by actorname. |
entrytag | A unique identifier for a dialogue entry (see Entrytags). |
entrytaglocal | The dialogue entry's localized entrytag for the current language. |
{{end}} | A numeric value based on the length of the current dialogue entry's subtitle text. If you want to override the default calculation of this value, assign a function to the static delegate ConversationView.overrideGetDefaultSubtitleDuration. |
{{default}} | Gets replaced with the Dialogue Manager's Default Sequence. Use this to include the Default Sequence in your dialogue entries' custom sequences. |
Certain commands also have command-specific keywords, too. Those keywords are described in the documentation for the command.
When specifying GameObjects in sequencer commands, you can also use 'tag=' to specify GameObjects by tags, such as:
SetActive(tag=Enemy, false)
| Message | Description |
|---|---|
Typed | Send when the subtitle's typewriter effect is done typing. (If your subtitle text uses a typewriter effect.) |
Examples:
Audio(Ding)@Message(Typed);
SetContinueMode(true)@Message(Typed)
Use // to include comments in your sequences. Example:
// This sequence does a close and plays audio
Camera(Closeup); // Cut to closeup of speaker
AudioWait(entrytag) // Play audio clip associated with node's entrytag
The "+" menu next to the Sequence field gives you access to the most common sequencer commands, drag-and-drop options, and a complete list of all sequencer commands available in your project.
Most of the menu items are self-explanatory and will add sequencer commands to the Sequence field for you.
The Audio Drag-n-Drop and GameObject Drag-n-Drop menu options allow you to specify what commands to add when dragging an audio clip or GameObject into the Sequence field. The GameObject Drag-n-Drop menu has submenus for a primary command and an alternate command. If you hold down the Alt key while dragging a GameObject into the Sequence field, it will add the alternate command instead of the primary.
The All Sequencer Commands menu items start a sequencer command. You can drag a GameObject into the Sequence field to complete the command, or type in the rest of the command manually.
You can register your own shortcuts using a Sequencer Shortcuts component or the Sequencer.RegisterShortcut() method. A shortcut is a string that's an alias for one or more sequencer commands. If you include the shortcut in a sequence, wrapped in double-braces, it will be replaced by its sequencer commands.
| Keyword | Description |
|---|---|
{{shortcut}} | Replaced by the shortcut's value. |
C# code example:
Sequence:
Camera(Closeup);
{{talk}}
Sequencer shortcuts stack. For example, let's say you add a "global" Sequencer Shortcuts component to your Dialogue Manager with a shortcut "cam" that's an alias for "Camera(Closeup)". In a later scene X, another Sequencer Shortcuts component sets "cam" to "Camera(Wide)". While in scene X, the "cam" shortcut will point to "Camera(Wide)". However, as soon as you leave scene X or deactivate its Sequencer Shortcuts component, "cam" will revert to its original value of "Camera(Closeup)".
You can also use the Sequencer Shortcuts component to optionally specify any GameObjects that are referenced by name in sequencer commands. This prevents the sequencer command from having to search the scene for the GameObject at runtime.
Sequences may also contain [var=varName] and [lua(code)] markup tags.
Example:
Delay([var=customizableDelay])
Below are some sequencer command examples:
Fade(in);
Camera(Closeup, listener);
Animation(jump)@2.5;
AudioWait(whisper)->Message(AllDone);
required AnimatorPlay(idle)@Message(AllDone)
Commands are not sequential. Every command will try to run at the start of the sequence unless it uses the @seconds or @Message(message). If you use either of these two syntaxes, the command will wait in a queue until the condition is met (i.e., the time mark has arrived, or the sequencer received the specified message).
In addition, many commands will start some kind of activity in Unity and then exit, leaving the activity running in the background. For example, the Audio() command will start an audio clip playing on an audio source and then exit immediately. These commands usually have an equivalent command that will wait until the activity is done. For audio, the AudioWait() command waits until the audio clip is done.
A sequence is not done until all of its commands are done. The duration of the sequence Audio(whisper) is 0 seconds. The duration of AudioWait(whisper) is the length of the audio clip.
This is an example fight sequence involving animation, sound, and camera work.
Camera(Closeup); Animation(Punch); Camera(Wide,listener,1)@2;
Audio(Oof,listener)@2.5; required Animation(Crumple,listener)@2.5
The sequence:
Note that we specified that the crumple animation is required; this ensures that the listener ends up in the correct position (crumpled on the ground) even if the player cancels (skips) the cutscene by pressing the Cancel Subtitle input defined in the Dialogue Manager's Input Settings or clicks the continue button before the command has reached its time to run. Very often, the last Camera() command in a sequence will be marked required to make sure the camera is set up for the next line of dialogue.
This example uses the @Message() syntax to keep a command queued until the sequencer receives a message.
SendMessage(StartCountdown, , Bomb);
SetActive(Bomb, false)@Message(Kaboom);
SetActive(Explosion)@Message(Kaboom)
The sequence does this:
You could use this C# script code on Bomb:
Note that the CountDownAndExplode() method above uses a static method Sequencer.Message() to send a message to the sequencer(s) on the Dialogue Manager GameObject.
This example uses the ->Message() syntax, which sends a message when a command completes, and the @Message() syntax, which waits until the sequencer receives a message.
Animation(Punch)->Message(Punched);
required Animation(Crumple,listener)@Message(Punched)
The sequence above plays the speaker's Punch animation. At the end of the animation, it sends the message "Punched" to the sequencer. The second Animation() command is configured to wait for the "Punched" message. When it receives this message, it plays the listener's Crumple animation.
Many sequencer commands use assets. For example, the AudioWait() sequencer command uses audio clip assets. By default, these commands will try to load assets from Resources. However, you can also direct the Dialogue System to use AssetBundles by registering a loaded AssetBundle with the PixelCrushers.DialogueSystem.DialogueManager.RegisterAssetBundle() method. The following C# script code registers an asset bundle with the Dialogue System, then runs a sequence to play an audio clip named "alarmSound" through a GameObject named "Loudspeaker". The Dialogue System will attempt to load "alarmSound" from all registered asset bundles, then from Resources folders.
Before freeing a registered asset bundle, make sure to unregister it from the Dialogue System:
Some sequencer commands, such as the Camera() command, control the camera. The sequencer will use the camera specified in the Dialogue Manager's Display Settings. If no camera is specified, the sequencer will borrow the current main camera (the active camera tagged MainCamera) and restore its position when the sequence is done. If you allow the sequencer to borrow the main camera, make sure to disable any external control during sequences and conversations so the sequence doesn’t fight for control. On the other hand, by specifying a sequencer command in the Dialogue Manager's Display Settings, you can use a separate camera with different post-processing effects from your main gameplay camera – for example, adding a strong depth of field to focus on the conversants and blur out the background. The sequencer will instantiate a copy of the camera and temporarily deactivate the original main camera. When the sequence or conversation is done, it will destroy the copy and reactivate the original if it was active before the sequence started. If it was inactive before the sequence, the sequencer will leave it inactive. IMPORTANT: If you use a separate sequencer camera (or cameras), you must set their Tags to MainCamera. If you have a different sequencer camera in each scene, it's easiest to let the sequencer find it automatically by tagging it "MainCamera". Otherwise you can write a short script to manually assign the Dialogue Manager's Sequencer Camera field. For example, you can attach this to your scene-specific sequencer cameras:
UseAsSequencerCamera.cs
The Dialogue System will only use the sequencer camera if the sequence contains any camera control commands. (You might want to have an in-game cutscene sequence happening the background while the player is free to continue playing. In this case, you probably don't want to switch to the sequencer camera.) If your sequence doesn't contain any camera control commands, you can manually switch to the sequencer camera anyway by adding the sequencer command: Camera(original)
The sequencer command Camera() moves the sequencer camera to angles specified in a prefab called the "camera angle prefab." This prefab is set in the Dialogue Manager's Display Settings. The camera angle prefab can actually be a GameObject in the scene, but a prefab is usually more convenient. If you haven't assigned a camera angle prefab, the Dialogue Manager uses a default prefab located in Resources ► Camera Angles.
The camera angle prefab is a hierarchy of GameObjects. Each child represents a camera angle defined by its relative position from the root GameObject. For example, if the child's position is 2 units back from the root GameObject, the camera will be placed 2 units back from its subject.
The simple camera angle hierarchy described below defines three camera angles (Closeup, Medium, and Full) progressively further from the subject.
Example:
    Camera Angles [root] (0,0,0)
        Closeup (0,2,1)
        Medium (0,2,2)
Full (0,2,3)When you use the Camera( x ) command in a sequence, it first checks the camera angle prefab. If it finds a child whose name matches x, it uses the offset of that child object from the camera angle prefab. It then places the camera at the same offset from the character.
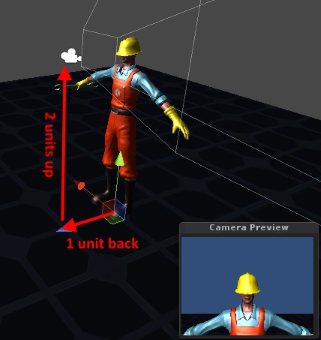
Example: The default camera angle prefab has a child named Closeup that's approximately 2 units up and 1 unit back. The sequencer command Camera(Closeup) moves the camera approximately 2 units up and 1 unit back from the character, as shown below:
The default camera angle prefab has another child named "Medium" that's 2 units up and 2 units back, which places the camera a little farther back from the character.
To add a camera angle to point at a seated character, you might add another child object that's only 1 unit up and 2 units back.
If the Dialogue System doesn't find a matching child in the camera angles prefab, it looks for a GameObject named x in the scene. If it finds one, it uses it as an absolute camera position. It moves the camera to the exact position and rotation as this GameObject. You can add empty GameObjects to the scene that specify absolute camera positions.
The default camera angle prefab contains these angles:
| Angle | Description |
|---|---|
Closeup | Front-on head shot |
Closeup Back | Back of head |
Closeup Left | Left side of head |
Closeup Right | Right side of head |
Medium | Head and torso |
Medium Back | Back of head and torso |
Medium Left | Left side of head and torso |
Medium Right | Right side of head and torso |
Full | Front-on body |
Full Back | Back of body |
Full Left | Left side of body |
Full Right | Right side of body |
Wide | Body with space (farther than Medium shots) |
OTS Left | Over the left shoulder |
OTS Right | Over the right shoulder |
Down | Looking down on the subject |
Up | Looking up at the subject |
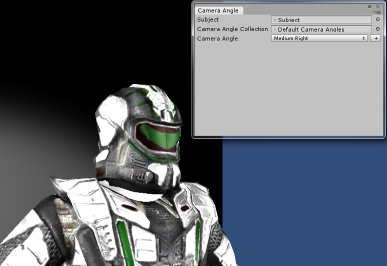
You can use the Camera Angle Editor tool to help you create camera angle prefabs. To use the Camera Angle Editor:
Remember to save your new camera angle collection as a prefab or scene object so you can assign it to your Dialogue Manager's Display Settings.
Entrytags allow you to simplify your sequences. Say for example that every dialogue entry plays a voiceover audio clip. If you have many dialogue entries, it would be burdensome to manually enter a unique AudioWait() command for each one. Using entrytags, you can configure a single sequence in the Dialogue Manager’s Default Sequence that will work uniquely for each dialogue entry.
In the sequencer, every dialogue entry has an associated "entrytag". This is a unique string in one of these formats:
| Format | Example | Notes |
|---|---|---|
| (ActorName)_(ConversationID)_(EntryID) | Adam_27_42 | Default format. Special characters not allowed in Lua strings are replaced by underscores (_). |
| (ConversationName)_(EntryID) | MyConv_42 | Special characters not allowed in Lua strings are replaced by underscores (_). |
| (ActorName)(LineNumber) | Player42 | Adventure Creator-style as "(ActorName)(LineNumber)". Characters not allowed in Unity filenames are replaced with underscores. The Dialogue System will attempt to assign a unique line number to every entry using the formula ConversationID*500 + EntryID. |
| (ConversationID)_(ActorName)_(EntryID) | 27_Adam_42 | Similar to default format but conversation ID is first. Special characters not allowed in Lua strings are replaced by underscores (_). |
| (ActorName)_(ConversationTitle)_(EntryDescriptor) | Adam_MyConv_Hi | EntryDescriptor looks for an entry title first, then menu text, and if none, uses the ID instead. Characters not allowed in Unity filenames are replaced with underscores. |
| (VoiceOverFile) | (special) | Assumes the dialogue entry has a custom field named VoiceOverFile. Sets entrytag to the value of this field. |
| (Custom) | (special) | You must assign a delegate method to DialogueDatabase.getCustomEntrytag(Conversation, DialogueEntry). |
The first format is the default. For example, say an actor named Adam is assigned conversation 27, line
entrytag will be Adam_27_42.You can change to the alternate formats by setting the Dialogue Manager’s Display Settings → Camera & Cutscene Settings → Entrytag Format. When you export your database content to CSV or a Voiceover Script in the Dialogue Editor, you can choose the entrytag format to use in the exported file. To get a list of all entrytags, export a Voiceover Script. This will generate a CSV spreadsheet file that you can give to your voice director and actors.
When you generate your voiceover audio files and/or animation clips, name them according to their entrytags. If you want to organize audio files by actor, you can create a separate folder for each actor and put them in a Resources subfolder inside the actor's folder, or in an AssetBundle (see How to Use AssetBundles).
Then, instead of manually specifying each filename in each dialogue entry's Sequence field, you can use a single Default Sequence on the Dialogue Manager such as:
Using the example above, when conversation 27 gets to line 42, it will play this sequence:
AudioWait(Adam_27_42)
In the sequencer, every dialogue entry also has a corresponding "entrytaglocal". This is the localized version of the entrytag. It's comprised of the entrytag followed by an underscore (_) and the current language code (see Localization).
If your game is localized into multiple languages, you may want to use entrytaglocal in sequencer commands that play voiceover recordings, such as the Audio() command.
In the example below, the AudioWait() command plays a localized audio clip. The AnimatorPlay() command plays the same animation state regardless of language.
AudioWait(entrytaglocal); AnimatorPlay(entrytag)
You can use the entrytag or entrytaglocal keywords in any sequencer command. Other example uses include (assuming the example entrytag value above):
| Command | Description |
|---|---|
Voice(entrytag,entrytag) | Play legacy animation lipsync with audio and animations named "Adam_27_42" |
Audio(entrytag) | Play an audio clip named "Adam_27_42". |
AnimatorPlay(entrytag) | Play a Mecanim state named "Adam_27_42" |
AnimatorTrigger(entrytag) | Set a Mecanim trigger named "Adam_27_42" |
Animation(entrytag) | Play a legacy animation named "Adam_27_42" |
Camera(entrytag) | Cut to a camera angle named "Adam_27_42" |
Delay()@Message(entrytag) | Wait for a sequencer message "Adam_27_42" |
The Dialogue System was originally developed for a voice-acted RPG, so support for voice acting (lipsync) is a core design feature. The Dialogue System doesn't analyze audio or generate lip sync animation itself. Instead it integrates with a number of tools such as FaceFX, Crazy Minnow Studios’ SALSA Lipsync Suite, and Rogo Digital’s LipSync Pro. (Note: LipSync Pro is no longer available to license on the Asset Store.) Detailed integration instructions for these tools are provided in Third Party Integration. This section provides a brief overview of some options.
In most cases, you’ll use a sequencer command to activate the third party lipsync tool.
If you're using FaceFX's XML curves, use the FaceFX() command provided by the FaceFX integration package located in the Third Party Support folder.
If you're using Crazy Minnow's SALSA with RandomEyes, use the SALSA() command. You must first import the SALSA with RandomEyes integration package.
If you’re using Rogo Digital's LipSync, use the LipSync() command. You must first import the LipSync integration package.
Mad Wonder's Cheshire Lip Sync generates Generic rig animations. You can add these to a layer (often a head layer) on your character's Animator Controller. Remember to set the weight of the layer to 1 so it takes effect.
Cheshire adds an animation event to the animation that plays its associated audio file. All you need to do is play the animation state, and the audio will be synchronized with it. To do this, use the AnimatorPlay() or AnimatorPlayWait() sequencer command. (AnimatorPlayWait() waits for the animation to finish.) For example, you could assign this to a dialogue entry's Sequence field:
AnimatorPlayWait(01northWindowModel)
Or, if you're entrytags, set the Default Sequence to this to always return to the state "IdleHead" when done:
AnimatorPlayWait(entrytag)->Message(Done);
AnimatorPlay(IdleHead)@Message(Done)
If you're using FacePlus, iClone, or another tool to generate FBX animations, how you use them in cutscene sequences depends on how you set up your avatar. Some developers set up a Humanoid Mecanim rig for the body and leave the face under Legacy animation control. In this case, use the Voice() sequencer command, which plays a legacy animation clip in conjunction with an audio (voiceover) file. Other developers put the face under Mecanim control, too, in which case you'll have an animation layer for the head. Simply use one of the many Mecanim sequencer commands, such as AnimatorPlay() or AnimatorTrigger(), to start the facial animation, and Audio() to start the voiceover audio.
The Dialogue System supports loading several types of assets, such as audio files and portrait images, using the Addressables package. To enable support, install the Addressables package via the Package Manager window, and tick the Dialogue System Welcome Window's USE_ADDRESSABLES checkbox.
Xbox/PlayStation Note: Some consoles require short paths for addressable bundles and assets. We recommend that you modify these Addressable Asset Group settings:
Assembly Definitions: If you use the Dialogue System's assembly definition files (asmdefs), you must add references to Unity.Addressables and Unity.ResourceManager.
In addition, add these settings to a link.xml file to prevent code stripping from removing Addressables methods:
At author-specified times, the Dialogue System can display a Quick Time Event (QTE) Indicator, which is a prompt for the player to choose to hit a trigger button before the indicator disappears. If the player triggers the QTE, typically something context-specific happens.
The built-in dialogue UI prefabs define two QTE indicators: "QTE 0 Good" and "QTE 1 Evil". If you want to give the player the option of performing an "evil" action (typically during a conversation), you can display "QTE 1 Evil" for a short time. Then your conversation can check if the player triggered the QTE and act accordingly.
QTE(0, 2, Punch_NPC, yes)Presents a two-second QTE opportunity for the player to punch the NPC. If the player inputs the QTE trigger in time, the Lua variable Variable["Punch_NPC"] will be set to "Yes".
The Dialogue System has built-in support for Timeline and Playables in Unity 2017+. To enable support, open the Welcome Window (Tools → Pixel Crushers → Dialogue System → Welcome Window) and tick Enable Timeline and/or Enable Cinemachine.
To set up Cinemachine support, import/enable Cinemachine. Then import Third Party Support ► Cinemachine Support.unitypackage for an example scene that demonstrates the Dialogue System's Cinemachine and Timeline features.
Cinemachine version info:
USE_CINEMACHINE_2 (via Edit > Project Settings > Player > Other Settings > Scripting Define Symbols).The Cinemachine Support package contains an example scene that uses Timeline and Cinemachine.
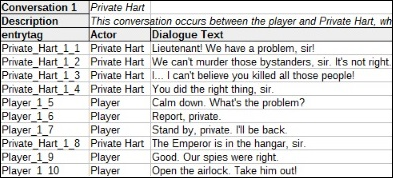
The door near Sergeant Graves is interactable. It plays a simple Timeline when the player uses it. This Timeline animates some lights, shows an alert message, and makes Sergeant Graves bark.
The player's camera is controlled by Cinemachine. The NPCs Private Hart and Dead Guard demonstrate how to use the Cinemachine Priority On Dialogue Event component to ease into conversation-specific virtual cameras.
The Dialogue System adds these playables to Timeline in the category PixelCrushers.DialogueSystem:
Makes the actor assigned to the Bark Track bark some text (which can be localized; see Localization) or bark from a conversation.
When previewing a Bark clip in the editor, the Dialogue System will show a simple text display. Since the actual bark may depend on runtime conditions, the text will be a best guess of what will be barked.
Starts a conversation with the actor assigned to the Conversation Track.
When previewing a Start Conversation clip in the editor, the Dialogue System will show a simple text display. Since the actual starting line may depend on runtime conditions, the text will be a best guess.
Simulates a continue button click to progress the conversation. You can use this to control the pace of conversations that don't involve player response menus. (You can't control the pace of conversations with player response menus because you can't know ahead of time how long the player will take to choose a response.) Set the conversation's Continue Button mode to Always, and use this playable to move to each dialogue entry. If you don't want the continue button to be visible, you can set the Continue Button mode to Never, and set the conversation's Default Sequence to something that waits forever, such as "WaitForMessage(Forever)".
When previewing a Continue Conversation clip in the editor, the Dialogue System will show a simple text display. Since the actual line may depend on runtime conditions, the text will be a best guess of what line will be played. If your conversation is a straight-line monologue without branches or player response menus, the best guess will usually be accurate.
Sets a quest state and/or quest entry state. More info: Quests
Shows an alert message (which can be localized; see Localization) using the Dialogue System's dialogue UI.
Plays a Dialogue System sequence.
Sends a message to the sequencer. Your sequences can listen for this message.
Runs Lua code.
The Timeline Trigger plays a Timeline (Playable Director) when a specified gameplay event occurs.
The Cinemachine Priority On Dialogue Event sets the priority of a Cinemachine Virtual Camera when a dialogue event occurs.
The Timeline() sequencer command controls a Timeline (Playable Director). You can use it to play, pause, resume, stop, and set the speed of a Timeline from within a sequence.
The CinemachinePriority() sequencer command sets the priority of a Cinemachine Virtual Camera in a sequence. You can use this to control camera motion in the sequence.
The CinemachineTarget() sequencer command sets look and/or follow target of a Cinemachine Virtual Camera.
The CinemachineZoom() sequencer command sets the 2D orthographic size of a Cinemachine Virtual Camera.
(Video Tutorial in Part 6 of Cutscene Sequences Tutorials)
To create your own sequencer commands:
[REMOVE THIS LINE].SequencerCommandTemplate to SequencerCommandFoo, where Foo is the name of your command. In your sequences, you'll use the command Foo().| Method | Description |
|---|---|
| Awake() | Initialize the command. You can use GetParameter() to read the parameters that were provided to the command. Call Stop() if the sequencer command completes its work in Awake. |
| Start() | (Optional) Use instead of Awake() if you want to use a coroutine. |
| Update() | (Optional) Progress the command forward one frame. For example, if the command smoothly moves an object over time, update the transform by Time.deltaTime |
| OnDestroy() | (Optional) "Clean up" the command. For example, move the object to its final position |
In Awake(), Start() and/or Update(), whichever is appropriate, call Stop() to indicate that the command is done. Otherwise the command will remain active forever, and the sequence will never register as finished.
Note that if the player cancels the sequence in the same frame that the sequencer command starts, there is a chance that only the Awake() and OnDestroy() methods will run. It's possible that Start() and Update() may not run in this case. If the command has to run critical code, put it in Awake() or OnDestroy().
To see examples, you can browse the source code to the built-in commands in Scripts ► Model-View-Controller ► View ► Sequencer ► SequencerCommands.