 |
|
This chapter describes how to use the Dialogue Editor to write conversations and quests. To import and export other formats, see Import & Export.
A dialogue database is an asset file. To create a dialogue database:
A dialogue database contains these categories:
| Category | Description |
|---|---|
| Database Properties | General settings such as the description, author and version, plus database-wide operations |
| Actors | Conversation participants (PCs, NPC, interactive objects) |
| Items/Quests | Item & quest definitions (items are optional data records for your use) |
| Locations | Info about locations (optional data records for your use) |
| Variables | User-defined variables to track conversation decisions, etc. |
| Conversations | Conversations between actors |
The Dialogue Editor section below describes each category in the context of editing its content.
To open the Dialogue Editor, use menu item Tools → Pixel Crushers → Dialogue System → Dialogue Editor, or click the Dialogue Manager's logo banner, or double-click on a dialogue database asset. The Dialogue Editor window works in conjunction with the Inspector view.
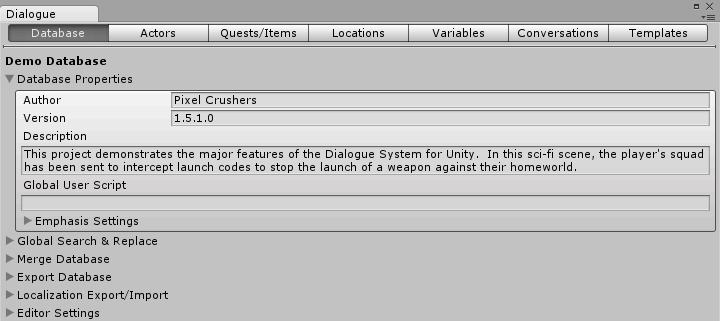
The Database category contains general dialogue database settings.
The Database Properties foldout contains:
The Global Search & Replace lets you search for (and optionally replace) text in your dialogue database.
The Merge Database foldout lets you to merge the content of another dialogue database into the one you're currently editing.
The Export Database foldout lets you export your dialogue database to various formats such as voiceover scripts and CSV (spreadsheets). For details, see Import & Export.
The Localization Export/Import foldout lets you export localization CSV files in a format that's simpler than the Export Database foldout. For more information, see Localization.
The Editor Settings foldout contains settings such as where and how frequently to make an automatic backup copy of your database.

The Actors tab defines conversation participants. You can specify the actor's name (and optional display name used instead in UIs), optional portrait images, and more. Portrait images can be Textures (“Editor and Legacy GUI”) assets or Sprites. If you use Sprites for an actor, use them exclusively in the Portrait Sprites section and leave Portrait Textures unassigned. Likewise, if you use Portrait Textures, leave Portrait Sprites unassigned.
Actors marked Is Player can use player response menus to present conversation choices to the player. You can also define custom data fields, accessible in the All Fields foldout.
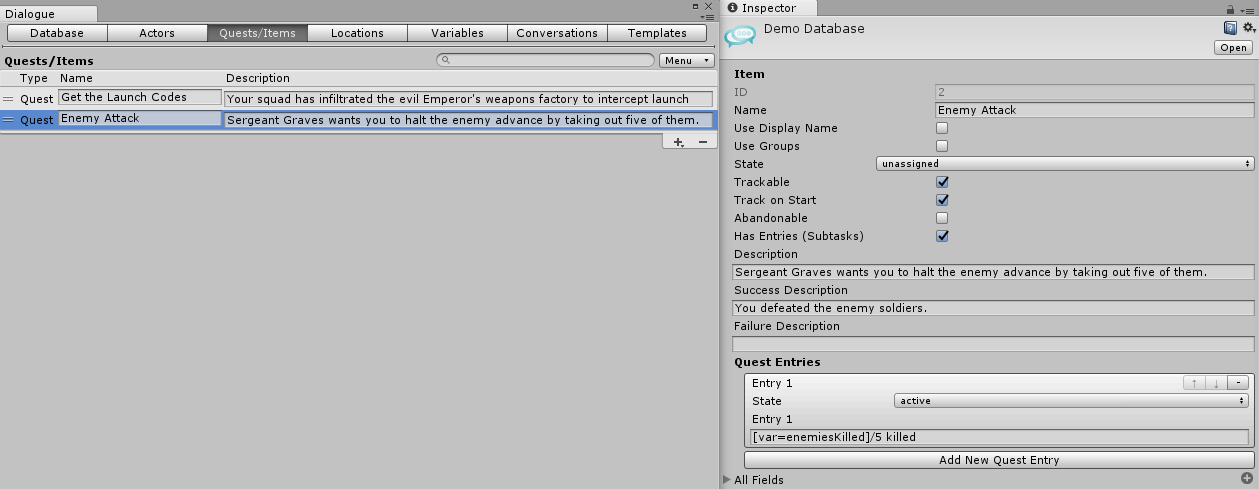
The Quests/Items tab defines quests and items. Items are just data records that you can use for your own purposes. The Dialogue System doesn't do anything special with items.
Quests are used by the quest system, which is detailed in the Quests section.
Use this tab to define quests and optional quest entries (subtasks). Your quest text can include markup tags. State is starting state of the quest. This value is not updated live at runtime; instead, view the live state of the quest on the Watches tab. If you want the quest to appear in the quest tracker HUD, tick Trackable and Track on Start (which turns on tracking as soon as the quest becomes active).

Locations are just data records that you can use for your own purposes. The Dialogue System doesn't do anything special with locations.
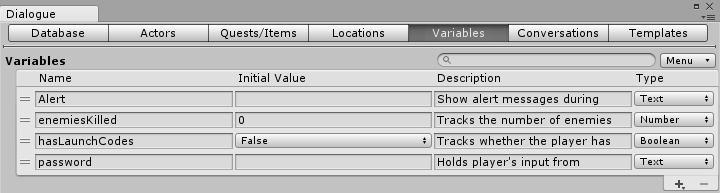
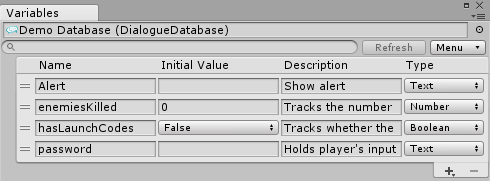
Variables are values that you can set and check during play. Use them to track information such as decisions that the player has made, the number of targets harvested or defeated for quests, etc. The Conversations tab and Dialogue System components provide dropdown menus to select variables and check or set them.
The Dialogue System will automatically create and set four variables when a conversation starts. You don't have to add them to your database, but you can add them if you want to easily reference them in dropdown menus in your conversations.
If your conversation assigns content to the built-in variable Alert, the Dialogue System will show it as an alert message at the end of the conversation. You can also use the ShowAlert() Lua function as described in Logic & Lua.
You can group your variables by using periods ( . ) in their names. Dropdown menus will show variable groups in separate submenus, making it easier to select variables when you have a lot of them.
You can also select Menu → Use Group Foldouts to collapse the variable list into separate foldouts for each variable group.
In addition, you can enter strings (such as group names) into the search filter at the top of the Variables section to filter the variables that are shown.
The Dialogue System also provides a secondary Variable View utility window for convenience. You can use it to view and edit variables while the Dialogue Editor window is open on a conversation, or to view runtime values of variables in play mode. You can also view runtime values in the Dialogue Editor's Watches tab.
To open the Variable View window, select menu item Tools → Pixel Crushers → Dialogue System → Tools → Variable Viewer. Or, from the Dialogue Editor's Variables tab, select Menu → Variable Viewer...
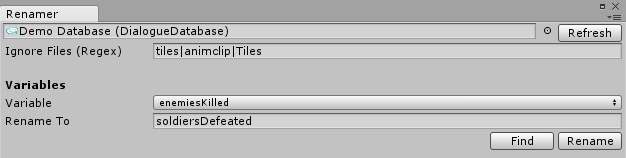
You can use the Renamer Tool to rename a variable across all databases, prefabs, and scenes. In scenes and prefabs, it updates variables referenced in Dialogue System Triggers and Increment On Destroy components. It does not update variable names in custom scripts.
To open the Renamer Tool, select menu item Tools → Pixel Crushers → Dialogue System → Tools → Asset Renamer.
Tip: The best way to change an Actor or Quest name is to use a Display Name. This also allows you to localize display names.
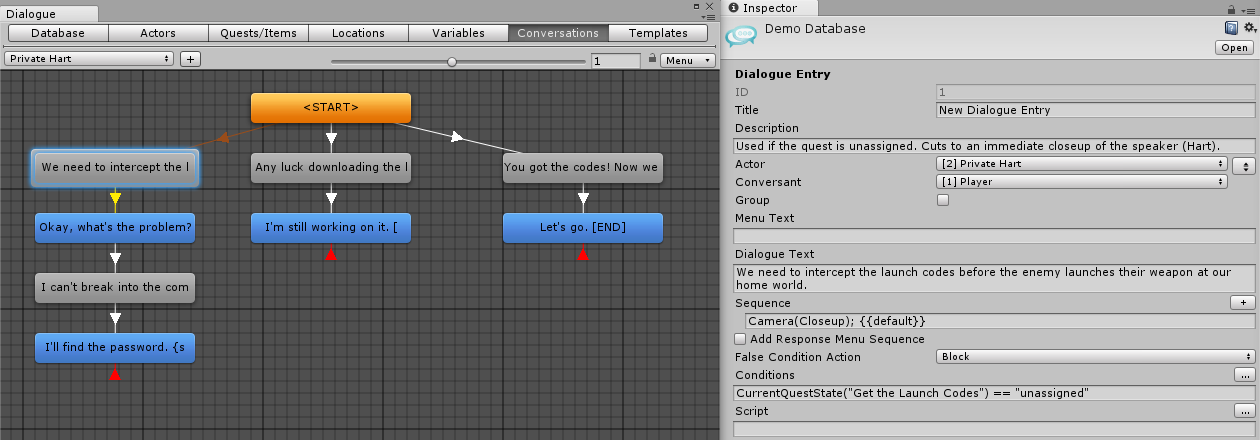
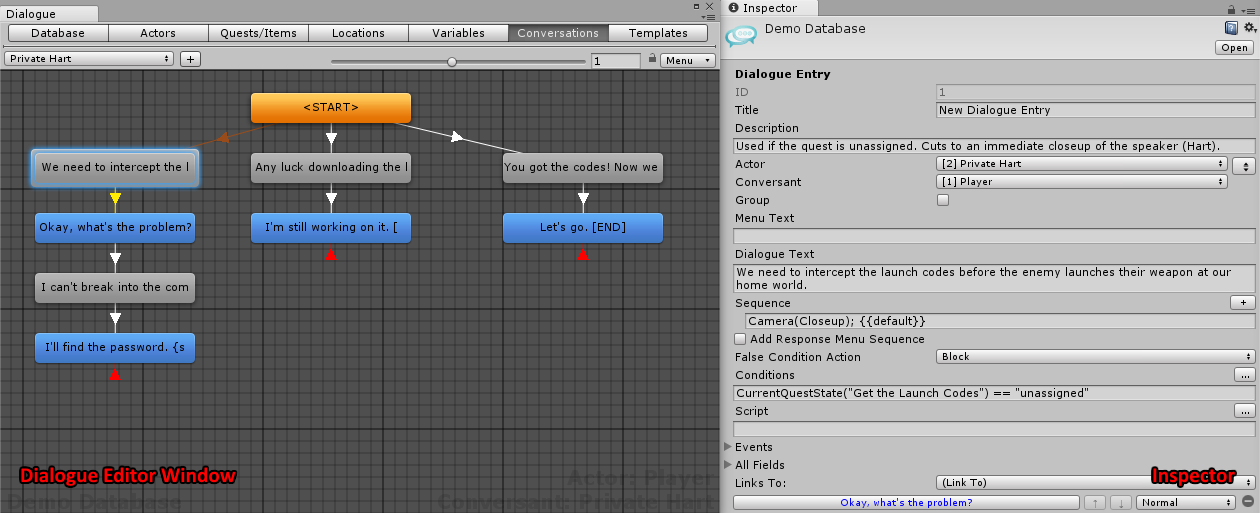
This is the heart of the Dialogue Editor. You can create, edit, and delete conversation using a node editor (shown above) or an outline editor (described at the end of this section). During play, this tab shows a live view of the current conversation. The current node is green.
The table below summarizes the primary operations you can perform in the node editor:
| Operation | Steps |
|---|---|
| Create new conversation | Click "+" to the right of the conversation title dropdown. |
| Edit conversation properties | Click empty canvas area. Use to set title, primary participants, and override Dialogue Manager's Display Settings. |
| Add/delete node | Right-click on node for context menu. (When adding a child node, hold the Shift key to use the same actor assignments instead of swapping them.) |
| Edit node | Click on node. |
| Edit link arrow | Click on link arrow. |
| Group nodes | Click-hold and lasso a group of nodes. Hold down Ctrl while releasing the mouse button. You can move node groups as a whole. |
| Change display settings | Use Menu in upper right. |
| Play conversation | Use Menu > Play... or right-click and select Play from the context menu to playtest your conversation in edit mode. |
The context menu and the Menu dropdown provide these options and more.
The editor also provides Keyboard Shortcuts.
Icons on the node provide a quick indication of certain values:
A conversation has a primary conversation actor (typically the player) and conversation conversant (typically an NPC). You can assign nodes to be spoken by additional actors, too.
The node's Inspector view contains several fields:
| Field | Description |
|---|---|
| ID | The entrys internal ID number. Typically leave alone. |
| Title | Optional text only for your reference. Not displayed to the player. |
| Description | Optional text only for your reference. Not displayed to the player. |
| Actor | The actor speaking this line of dialogue. |
| Conversant | The actor (listener) being addressed by the speaker. |
| Group | If ticked, marks this as a passthrough node used to group child nodes. |
| Menu Text | Text shown in the player response menu, such as a short paraphrase of the Dialogue Text. If blank, it defaults to Dialogue Text. |
| Dialogue Text | Text shown in subtitles. If blank, it defaults to Menu Text. Note: You can also double-click on a node to enter Dialogue Text directly on the node. |
| Sequence | Cutscene sequence to play when the actor speaks this line. If blank, the Dialogue Manager's Default Sequence will be used. See Cutscene Sequences for more information. |
| Response Menu Sequence | Optional sequence to play in the background while the response menu is visible. If the player makes a selection in the response menu while the response menu sequence is playing, the response menu sequence will end and the next dialogue entry's sequence will begin on the same frame. |
| Conditions | Conditions that must be true to allow the line to be spoken or presented in the player response menu. You can use the “...” dropdown menu or enter Lua code directly. See Conditions for more information. |
| False Condition Action | What to do when Conditions are false. Block means don't evaluate nodes linked from this one. Passthrough means ignore this entry but evaluate its children to be spoken. |
| Script | Actions to run when the node is spoken. You can use the "..." dropdown menu or enter Lua code directly. NOTE: The Script field runs before the property DialogueManager.currentConversationState is set. This is because it's possible that the Script field might affect the value of DialogueManager.currentConversationState. If custom functions in Script need to access DialogueManager.currentConversationState, write them to wait until the end of the frame. |
| Events | UnityEvent(s) to run when this node is spoken. |
| Links To | Manually set links using drop-down menus, adjust their priorities, and adjust their order. You can also add cross-conversation links here. See also: Conversation Position Stack Functions |
Nodes are also referred to as dialogue entries. This manual uses the terms interchangeably.
The Conversations section has a Menu with options to do several things such as viewing the conversation's main properties, show/hide information such as IDs and portraits in the node editor, snap to grid, and reorder internal IDs. Note that you can reorder IDs in a depth-first fashion or an alternate method that reorders parent nodes before converging child nodes.
Each conversation starts with an orange START node that you should typically leave alone. Right-click on START and select Create Child Node to create actual content nodes from this entry point.
The START node has some unique properties:
You can also select links between nodes to set their priorities. If a node has outgoing links of different priorities, the Dialogue System will check all links of the highest priority first. If it finds any valid links at that priority, it will stop checking and only use those links. Otherwise it will check the next priority down, and so on.
To link to another conversation, inspect a node and from the Link To: dropdown select (Another Conversation).
You can include these markup tags in your Dialogue Text, as well as actor display names, quest display names, and quest descriptions.
| Tag | Description |
|---|---|
| [f] | (Force) Display the response menu even if this is the only response, and even if the Dialogue Manager's Always Force Response Menu checkbox is unticked. |
| [auto] | (Auto-response) Force this response to be automatically selected, bypassing the response menu. This tag takes precedence over [f] or the Dialogue Manager's Always Force Response Menu checkbox. |
| [a] | Display the response menu text in italics. |
| [nosubtitle] | Don't show this text as a subtitle. |
| [em#]...[/em#] | (Emphasis) Apply an emphasis setting to the text. Set emphasis appearances on the Database tab. |
| [var=variable] | (Variable) Replace the tag with the value of a variable. If your variable name has blank spaces or hyphens, you must replace them with underscores. For example, if your variable is named My Job-Title, use "I need a doctor, not a [var=My_Job_Title]!" |
| [var=?variable] | (Variable Input) Prompt the player for input, and store it the variable named by varName. Internally, this runs the TextInput() sequencer command as TextInput(Text Field UI,varName,varName). Note that the text field UI must be named Text Field UI, |
| [autocase=variable] | Like [var=variable] except capitalizes first letter at beginning of sentences, lowercase otherwise. |
| [pic=#] | Override the actor's portrait image. The number is an index into the actor's list of portrait images as defined on the Actors tab. |
| [pica=#] | Override the actor's portrait image using an image from the primary actor. |
| [picc=#] | Override the conversant's (listener's) portrait image. |
| [position=#] | Use a specific response button position. If the entry is shown in a response menu, it will always be in the specified position. Say for example that "evil" options are always in position 6. Use this tag: "[position=6]I hate puppies." Position number is zero-based (starting with [position=0]) so it aligns with the dialogue UI's Buttons list. |
| [panel=#] | Use a specific subtitle panel when using the Standard Dialogue UI system. |
| [lua(code)] | Replace the tag with the return value of some Lua code. For example: "Sorry, that item is [lua( Variable["PlayerFunds"] + 1 )] gold, out of your price range." |
If you use Chat Mapper, these tags are new to the Dialogue System and are not recognized by Chat Mapper: [auto], [position], [nosubtitle], [panel], [lua].
If your node's Dialogue Text has become too long and you want to split it into multiple nodes, add pipe characters ( "|" ) where you want to split, and select Menu → Split Pipes Into Nodes → Process Conversation.
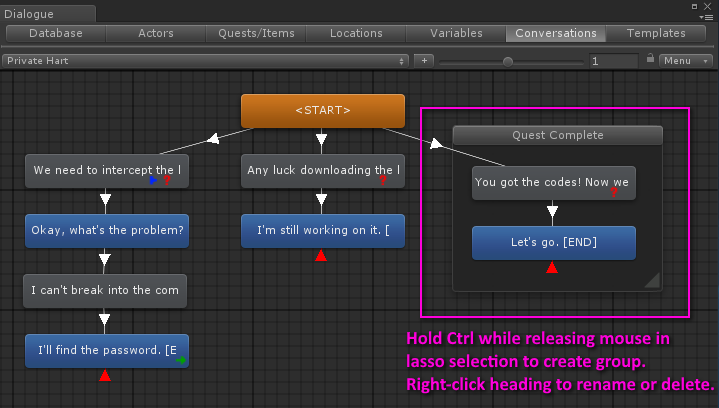
To group nodes, click-drag a lasso around the nodes. Hold down Ctrl while releasing the mouse button.
To rename or delete a grouping (without deleting the nodes themselves), right-click on the group heading.
You can use these keyboard shortcuts in the node editor:
| Key Combo | Alternate | Operation |
|---|---|---|
| Home | — | Move to top left of canvas. |
| PgUp/PgDn | — | Page canvas up/down. |
| Delete | Backspace | Delete current node or link. |
| Ctrl+Alt+D | Cmd+Alt+D | Duplicate current node or link. |
| Ctrl+Alt+N | Cmd+Alt+N | Create new node. |
| Ctrl+Alt+C | Cmd+Alt+C | Copy current selection to clipboard. |
| Ctrl+Alt+V | Cmd+Alt+V | Paste clipboard. |
| Alt+Click | — | Create link from selected node. |
| Shift | — | When creating a child node, hold Shift down to use the same actor assignments instead of swapping them. |
| Ctrl+Shift+< | Cmd+Shift+< | Go to previous conversation. |
| Ctrl+Shift+> | Cmd+Shift+> | Go to next conversation. |
You can use a point-and-click dropdown menu or manual entry to add Lua expressions to the Conditions field to allow the conversation to use that entry only if the Lua expressions are true. For example, say you only want an NPC to say a line of dialogue if the player has visited Paris. You could define a variable "VisitedParis" whose initial value is false. When the player visits Paris, set the variable true. Then add a condition to the NPC's dialogue entry:
Variable["VisitedParis"] == trueThe Dialogue System evaluates links one extra level ahead of the conversation. It has to do this to properly handle certain continue button modes. This means that if you set a value in one node (e.g., node A), you can't then check it in the next node (node B) because the Dialogue System will have already checked the condition of node B prior to running node A. Instead, you need to separate them with an empty spacer node to delay evaluation of the condition. To demonstrate this, we'll use an example conversation of flipping a coin:
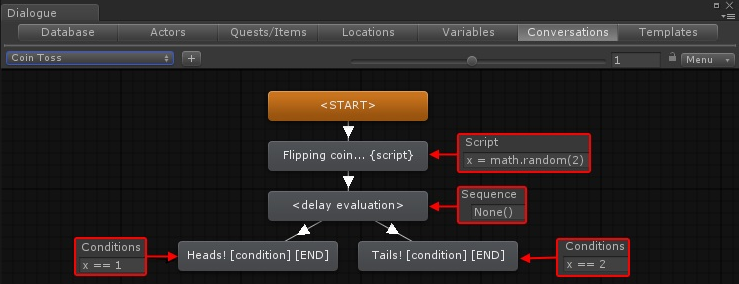
In the example above, the "Flipping coin" node sets a variable x randomly to 1 or 2. We can't immediately follow this with the two conditional nodes ("Heads" and "Tails") because the Dialogue System evaluates one level ahead – meaning that it's already tested the conditions of "Heads" and "Tails" before the "Flipping coin" node has even run.
To work around this, we added an intermediate node to the conversation, set the Title to "delay evaluation" to remind ourselves what it's for, and left the Dialogue Text blank. Then we set the Sequence to None() so it will immediately progress to the next step in the conversation. If you're using continue buttons, then on the Sequence field select "+" → Continue → Simulate continue button click instead of using None().
When working with Conditions, it may also be helpful to temporarily set the Dialogue Manager's Debug Level to Info. This will add a lot of information to the Console window. If you pick through it, you'll find lines similar to the ones shown below:
Dialogue System: Lua(x = math.random(2))
Dialogue System: Referee says 'Flipping coin...'
Dialogue System: Block on False Link (Referee): ID=5:3 'Heads!' Condition='x == 1'
Dialogue System: Add Link (Referee): ID=5:4 'Tails!' (True)
Dialogue System: Referee says 'Tails!'
Lines 3-4 indicate that the link to 'Heads' is blocked because 'x==1' is false, but it's adding the link to 'Tails' (because 'x==2' is true).
NOTE: If you don't want to worry about this, tick the Dialogue Manager's Other Settings > Reevaluate Links After Subtitle. This will perform evaluation again after showing a subtitle, so you don't have to create an intermediate node like above, but at the cost of evaluating children twice.
If you want to track which dialogue entries have been used (visited), for example to conditionally block them from being used again, use SimStatus. Inspect the Dialogue Manager and tick Include SimStatus. This adds a runtime string value Dialog[#].SimStatus for every dialogue entry, where # is the dialogue entry's ID number. You can find the ID number by inspecting the dialogue entry. It will also set an internal Lua variable “thisID” that you can select from the “...” dropdown menu to refer to the current node. SimStatus uses about 20 bytes per dialogue entry node, so if you have tens of thousands of lines of dialogue you probably don't want to tick this unless you really need it. Instead, use variables in specific areas where you need conditions.
The possible values of SimStatus are:
You can use it similarly to this conversation (shown in outline mode for brevity):
[1] Dancer: "What can I do for ya, detective?"
     [2] Player: "Where were you on Saturday night?"
         Conditions: Dialog[3].SimStatus == "Untouched"
          [3] Dancer: "Right here on this stage until dawn." [END]
     [4] Player: "You said you were here until dawn. Then who made a call from your place at 9PM?"
         Conditions: Dialog[3].SimStatus == "WasDisplayed"
          [5] Dancer: "My cousin's staying with me for the week. What's it to ya?" [END]
You can also use the special variable value thisID to refer to the current node's ID. For example:
Dialog[thisID].SimStatus ~= "WasDisplayed"
To access the SimStatus of a different conversation:
Conversation[#].Dialog[#].SimStatus == "WasDisplayed"
where the first # is the conversation ID and the second # is the dialogue node ID. (By itself, Dialog[#] is just a shortcut for the current conversation.)
SimStatus is always "Untouched" for dialogue entries whose Group checkboxes are ticked.
Formatting Old Responses Differently In Response Menu
If you use SimStatus, the Dialogue Manager's Input Settings has a dropdown Em Tag for Old Responses. You can change this from None to apply an emphasis tag to player response entries that the player has already selected. Some games use this to remind players what responses they've already tried.
The Event foldout contains a UnityEvent called OnExecute(). You can also click Add Scene Event to add a second OnEecute() event. These UnityEvents are similar to adding an event handler to a Unity UI Button's OnClick() event.
(Video Tutorial: How to Configure Scene-Based Events)
You cannot assign scene objects to the default OnExecute() event. This is because the dialogue database exists independently of scenes. Instead, you must assign an asset file such as a prefab or ScriptableObject.
In the example below, we'll create a ScriptableObject asset that provides a method to play audio clips. Then we'll assign that method to a dialogue entry's OnExecute() event.
First, create a new C# script named TestScriptableObject containing the code below. To keep the example short, the code doesn't do any error checking.
TestScriptableObject.cs
Next, in the Project view select Create → TestScriptableObject. This will create an asset file:
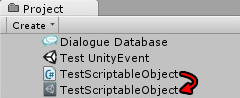
You may want to move your asset into a folder named Resources. This way it will be included in the build. In some versions of Unity, some platforms will strip out assets that it doesn't think it needs. This most commonly happens to ScriptableObject assets that aren't referenced in any scenes.
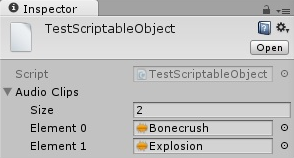
Inspect your new asset file. You'll be able to assign audio clips to it:
Finally, inspect a dialogue entry node's OnExecute() event, click the "+" button, and assign TestScriptableObject. Select the method you want to execute (PlayAudioClip) and specify the index of the audio clip that you want to play:

Note: The default OnExecute() is not supported by the Database Export feature or third party format importers.
If you click Add Scene Event, it will add a second OnEecute() event to which you can assign scene objects. The actual UnityEvent lives in the current scene, so it's compatible with the Database Export feature.
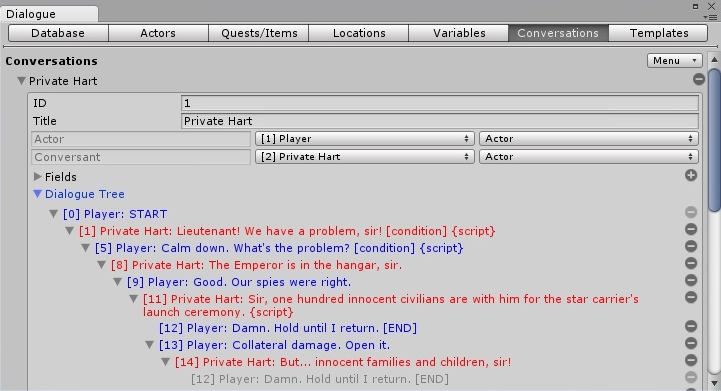
You can also edit conversations in outline mode as shown above, which may be more familiar to users of editors like Bioware's Aurora Toolset. To switch to outline mode, select Menu → Outline.
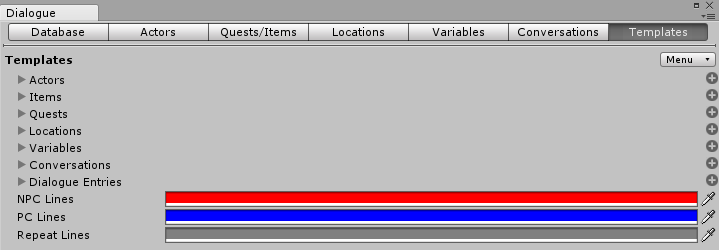
Use the Templates tab to change the default fields that are added to new actors, quests, dialogue entries, etc. You can also change the colors used on the Conversation tab's outline mode. The menu in the upper right allows you to save and load template settings, to populate the template with custom fields already present in the database, and to apply the template to all content in the database.
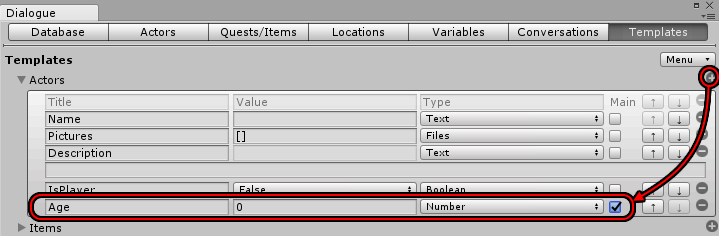
To add a new custom field, expand the category that you'd like to customize. Then click the gray "+" circle and provide the field details. In the screenshot below, we've added a custom Age field to actors. We also chose to tick the Main checkbox, which tells the Dialogue Editor to show it in the actor's main inspector section and not just in the All Fields foldout.
If you're comfortable with scripting, you can define your own field types with their own custom Dialogue Editor drawers. To define a new custom field type:
You can find an example in Scripts ► Editor ► Fields ► Examples.
Note: Custom field types are a design-time convenience that allow you to add custom editor drawers. At runtime, all custom fields are treated as Text.
You can save conversation tree structures as templates and then re-use them for other, similarly-structured conversations.
To save a conversation as a template, select Menu > Templates > Save Template JSON....
To create a new conversation from a template, select Menu > Templates > New From Template. You can choose a built-in template (such as a general-purpose quest conversation template) or a JSON template that you've previously saved.

At runtime, a Watches tab replaces the Templates tab. In this tab, you can view the runtime values of variables, quests, and arbitrary Lua expressions. You can also run Lua expressions using the code bar at the bottom of the window.
The Dialogue Editor's Database section has a Check For Issues foldout that can check your dialogue database for common issues such as:
It's generally much easier to work with a single dialogue database. However, the Dialogue System supports multiple databases. Multiple databases require more management on your part to keep track of them and to load in and out of memory as appropriate, but they can be useful to split up your content either for organization or to reduce the amount of content loaded into memory at any given time.
Here are some guidelines for deciding between using a single database or multiple databases:
Whether you use a single database or multiple, remember that you can use forward slashes in conversation titles to group your conversations. For example, you could title your conversations:
This will group them into submenus "Companions", "Desert", and "Jungle" in the Dialogue Editor, making it much easier to select conversations. The "Companions" submenu will have a sub-submenu for "Robot Butler".
If you decide to use multiple databases, put all of your global data in a global database, and assign this as the Dialogue Manager's Initial Database. This should include everything that needs to be in a saved game or accessible regardless of location, such as:
When using multiple databases, you can set each database's Base ID to reduce the need to run the Unique ID Tool when playtesting.
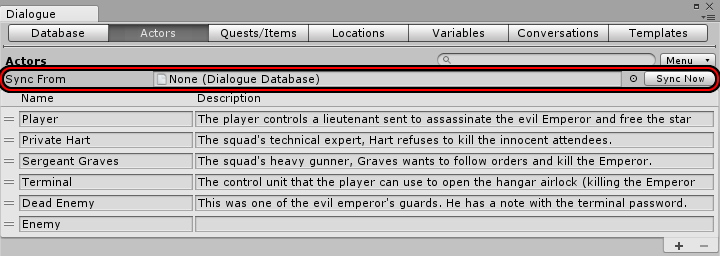
If you use multiple dialogue databases, you may want to define all of your actors in one database, all of your quests in another, etc. You can then configure a dialogue database to pull elements from these databases. To do this, select Sync From DB in the tab's menu. Then select the source database that you want to sync elements from.
You can add more elements, but keep in mind that elements with the same ID as those in the source database will be overwritten. For example, say you're writing a game where the player travels from planet to planet with a party of companions. You can define the player and companion actors in a source database. Then you can create a separate database for each planet that syncs from this source database and adds actors specific to that planet.
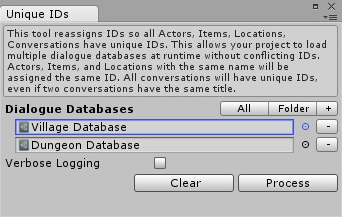
If you only use one dialogue database, you can skip this section. Internally, every element in a dialogue database (actor, item, conversation, etc.) has an ID number. Within a single database, these IDs are usually unique for each type of element. However, it's likely that an ID used in one database may also be used in another database. If you load both databases at runtime, the IDs will conflict. The Dialogue System won't know which asset you're referring to with a given ID. To prevent this, use the Unique ID Tool: Tools → Pixel Crushers → Dialogue System → Tools → Unique ID Tool. Simply add the databases for which you want to guarantee unique IDs, and then click Process. If you tick Verbose Logging, the tool will log all ID number changes in the console.
Tip: If you set each database's Base ID, it can make ID conflicts very unlikely, reducing the need to run the Unique ID Tool.
Every dialogue database loaded into memory needs unique IDs for each element type – for example, every actor should have a unique actor ID. If you use Sync From DB, then new elements will be assigned IDs that are different from the global assets' IDs, so you don't need to worry about unique IDs. However, it's entirely possible that your Desert database could contain IDs that overlap with IDs in your Jungle database. This might be fine, though. As long as you don't load Desert and Jungle at the same time, there won't be any ID conflicts in memory.
On the Dialogue Editor's Database tab, you can assign values to Database Properties > Base ID for each database. When you add actors, variables, conversations, etc., their internal IDs will start numbering from the Base ID. For example, set the global database's Base ID to 1, the next database's Base ID to 10000, the next to 20000, etc. This helps reduce ID conflicts across databases, which makes it easier to playtest without having to run the Unique ID Tool first. However, you should still run the Unique ID Tool before final testing and release to make absolutely sure that there are no ID conflicts
To load extra databases into memory at runtime, use an Extra Databases component. For example, add an Extra Databases component to an empty GameObject in your Desert scene. Set the Add Trigger to On Start, and assign the Desert database. Set the Remove Trigger to On Destroy, and assign the Desert database.
If you load multiple databases into memory, either using the Extra Databases component or DialogueManager.AddDatabase(), the property DialogueManager.masterDatabase will contain the content of all of the databases loaded into memory.
<< Welcome to the Dialogue System for Unity! | Dialogue Manager >>