The Dialogue System's UI is modular and highly customizable. You can use Unity UI, legacy Unity GUI, NGUI, Daikon Forge GUI, 2D Toolkit UI, or your own custom UI system by implementing a simple C# interface. Using the provided systems, you can create layouts for whatever design you can imagine.
The Dialogue System includes several prefab layouts for Unity UI, legacy Unity GUI, NGUI, TK2D, and Daikon Forge GUI. Changing the look-and-feel of your conversations is as easy as assigning the one you want to use to the Dialogue Manager's Display Settings.
The dialogue UI is the primary user interface for the Dialogue System. It displays conversation subtitles, player response menus, quick time events, and gameplay alert messages.
The easiest way to change the Dialogue System's appearance is to assign a different dialogue UI prefab:
If you've added the Dialogue Manager prefab located in Dialogue System/Prefabs, your scene already has a set of generic UIs. Otherwise you can follow these instructions to add a different Unity UI prefab:
Easiest Option:
Prefabs/Unity UI Prefabs, find a prefab named "XXX Bundled UI", where "XXX" is a name such as "Generic", "Mobile", or "Runic". Add this as a child of the Dialogue Manager. These bundles contain a set of UIs:Manual Option:
For more control, follow these steps:
Prefabs/Unity UI Prefabs and drag it under the Canvas.Prefabs/Legacy Unity GUI Prefabs.
Prefabs for other GUI systems are located in the Third Party Support folders for those systems.
The rest of the dialogue UI documentation section discusses how to customize prefabs and create your dialogue UI.
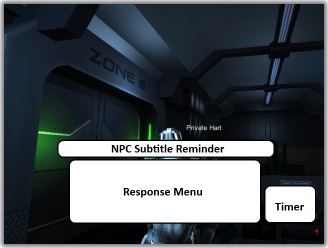
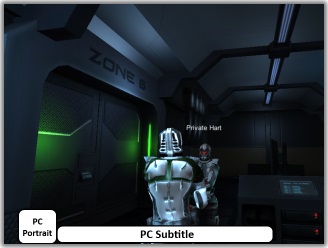
The provided Dialogue UI implementations use the following elements. The size and placement of the elements below are entirely customizable. The image below is just a conceptual example.

| Element | Description |
|---|---|
| NPC Subtitle | The line of text spoken by the NPC as it's being spoken. The content comes from the dialogue entry's Dialogue Text, or Menu Text if Dialogue Text is empty |
| NPC Portrait | The NPC's portrait texture and name. The portrait texture comes from the portrait image assigned to the actor in the dialogue database. The name comes from the conversant GameObject's name, or its Override Actor Name component if present |
| NPC Subtitle Reminder | The line of text that was just spoken by the NPC, usually shown while presenting the player response menu, so the player can remember what he or she is responding to |
| Response Menu | The menu of responses that the player can choose from. These are the dialogue entries that branch from the NPC's last line and whose conditions are true |
| Timer | If the timer is enabled, this element counts down during the response menu. If the player doesn't choose a response before the time runs out, the Dialogue System automatically chooses a default response |
| PC Subtitle | The line of text spoken by the PC as it's being spoken |
| PC Portrait | The PC's portrait texture and name. |
Each UI can position these elements in different places, add additional elements, or omit elements. The positions in the image above aren't important; the image is only provided to give you an idea of what a dialogue UI is composed of. The Dialogue Manager's Display Settings can also affect which elements are shown at any given time.
For simplicity, the image above doesn't show:
| Element | Description |
|---|---|
| Continue Buttons | Optional buttons you can configure to enable skipahead/continue on subtitles. See Continue Button for example procedures |
| Quick Time Event (QTE) Buttons | Optional buttons you can configure for quick time events. See How to Add Quick Time Events (QTEs) for more information |
| Alert Message | Controls used during gameplay to deliver gameplay alert messages |
When the NPC is delivering a line, these elements are usually active:

When the Dialogue System presents the player response menu, these elements are usually active:

When the PC is delivering a line, these elements are usually active:

The Bark Dialogue UI is an exception to this layout. Instead, it uses the participants' Bark UI components to display the conversation.
If you're going to require the player to click a "continue" button to progress past the current subtitle, then on the Dialogue Manager object set Display Settings > Continue Button to something other than Never. Add and configure the continue buttons on your dialogue UI.
The dialogue UI documentation for each GUI system describes how to configure continue buttons.
Keyboard and gamepad navigation support depends on the GUI system you're using. The Dialogue System's Unity GUI system includes Keyboard/Gamepad Navigation support.
If you want to prompt the player for text input during conversations, you need to create a GameObject containing a component that implements ITextFieldUI, such as UnityTextFieldUI.
This object should be active in the scene, although child objects needn't be active.
The dialogue UI documentation for each GUI system describes how to add a text field.
You can find a template for implementing your own ITextFieldUI in Scripts/Templates.
<< How to Set Up the Dialogue Manager | Legacy Unity GUI Dialogue UI >>