This page describes how to set up the Dialogue System with More Mountains' TopDown Engine. (TopDown Engine is required.)
TopDown Engine copyright © More Mountains.
Import these two packages:
They will unpack files into these folders:
This integration adds functionality to start conversations within the TopDown Engine framework.
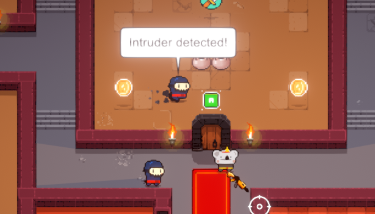
It includes an example scene based on the Koala2D scene. It contains two Dialogue System-enabled NPCs. The ninja in the room directly above the player demonstrates barks. The ninja in the hall (just below this room) demonstrates a conversation.
If the camera doesn't follow the player in this scene or TopDown's original Koala2D scene, make sure the Scripting Define Symbol CINEMACHINE_INSTALLED is set.
If you see a warning about 2D colliders, make sure the Scripting Define Symbol USE_PHYSICS2D is set.
You can set both of these symbols using the Dialogue System's Welcome window (Tools > Pixel Crushers > Dialogue System > Welcome Window).
To play the example scene, you will also need to import the Inventory Engine Support package.
Use these steps to set up a TopDown Engine scene for the Dialogue System:
If you're using More Mountains' Inventory Engine, see Inventory Engine Support. In particular, please keep in mind that Inventory Engine disables UI navigation while the inventory is closed. If you want to be able to navigate other UIs with a joystick/keyboard such menus, see How To Set Up Scenes.
To perform actions when a character such as an NPC dies or is revived, add an On Death Event component. The example scene uses this component to disable the barking NPC's Bark On Idle component and to deactivate the conversing NPC's Conversation Trigger child GameObject. You can also use it to trigger Dialogue System Triggers for kill quests.
To set up a quest log window:
TopDown Engine uses Cinemachine, which keeps a tight grip on camera control. Instead of using Camera() or Zoom2D() commands to control the camera directly, control Cinemachine. First enable Cinemachine support using the Dialogue System's Welcome Window.
Cinemachine uses components called Cinemachine Virtual Cameras (vcams for short) that define how the camera should work (e.g., follow targets, zoom in on a location, etc.). Each vcam has a Priority value. Cinemachine uses the vcam that has the highest Priority. TDE's Koala Dungeon scene has a vcam named "CM vcam1" with a Priority of 10.
You can add another vcam to the scene that focuses on a conversation NPC. Give it a Priority of 0 so Cinemachine doesn't use it during regular play. When the conversation starts, increase its Priority to something higher than 10.
There are two ways you can control a vcam's Priority in a conversation:
You can use both, too. For example, use Cinemachine Priority On Dialogue Event to prioritize a vcam that focuses on the NPC at the start of the conversation. Say the NPC points to a mysterious object that she wants the player to investigate. Use CinemachinePriority() to prioritize a different vcam that focuses on the mysterious object. Later, use another CinemachinePriority() to drop the priority of the mysterious object vcam. This will cause the NPC's vcam to take effect again.
TopDown Engine has a SaveLoadManager. To tie the Dialogue System in, set up the Dialogue System's Save System, add a Dialogue System TopDown Engine Event Listener component to the scene, and tick Handle MM Save Load Events and Save To Pixel Crushers On Level End.
Also add this component if you plan to use the Character Persistence component on your player prefab. (Reminder: When using Character Persistence, configure your Corgi Level Manager to instantiate the player from a prefab; don't put the player GameObject directly in the scene at design time.)
In your LoadingScreen scene, replace the MMSceneLoadingManager component with PixelCrushersMMSceneLoadingManager.
If you want to use the Dialogue System's save system as the primary save system, the integration includes a TDECharacterSaver script that you can use as a starting point to save character info. The script saves the character's Health stats.