This page describes how to set up the Dialogue System with More Mountains' Corgi 2D + 2.5D Platformer Engine. (Corgi Engine is required.)
Corgi copyright © More Mountains.
Corgi Support Setup
Import the package Third Party Support/Corgi Support. This will unpack files into the folder Third Party Support/Corgi Support.
This package adds functionality to start conversations within the Corgi Engine framework.
How To Set Up Scenes
Use these steps to set up a Corgi scene for the Dialogue System:
- Add a Dialogue Manager GameObject.
- A good starting point is the Dialogue Manager prefab in the Prefabs folder.
- Inspect the Dialogue Manager's dialogue UI (e.g., Dialogue Manager > Canvas > Generic Unity UI Dialogue UI).
- To allow gamepad or keyboard navigation, tick Auto Focus.
- If you're going to use world space UIs (e.g., overhead bubbles like Corgi's basic dialogue bubble), tick Find Actor Overrides.
- If you want to allow the player to click on response menu buttons using the mouse, inspect UICamera > Canvas > Fader and untick Raycast Target. Otherwise the Fader will prevent mouse input.
- If the player will be using the gamepad to select response menu buttons, check UICamera > EventSystem and Standalone Input Module's inputs are what you want to use. You can usually leave these at the default.
- To set up an NPC:
- Add an instance of the DialogueUI prefab as a child of the NPC. This prefab is located in Corgi Support > Example > Prefabs.
- Add a ConversationZone script, which works similarly to Corgi's DialogueZone script except it starts a Dialogue System conversation. This script also has options to temporarily disable Corgi's player and/or camera control. Alternatively, you could add a SetComponentEnabledOnDialogueEvent component to the player prefab to disable player control.
- Optionally add an Override Actor Name component to specify the name that appears in dialogue. Otherwise it will use the GameObject name.
- For more details about ConversationZone, see How to Run Conversations in Corgi.
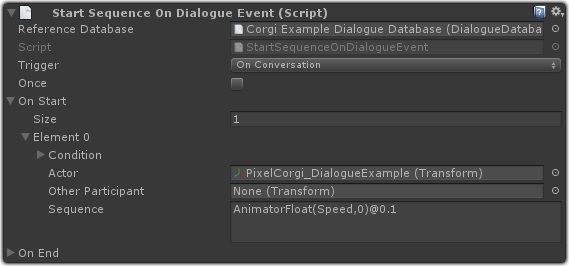
- If you want the player to stop playing its movement animation during conversations, add a Start Sequence On Dialogue Event component to the player prefab. Specify a sequence, typically using the AnimatorFloat() command, to set the player's animator parameters to values that will make it stop. For example, the player prefab used by the Dialogue System's Corgi Example is configured with this component:
because its animator controller uses a parameter named "Speed".
Depending on what animator controller you're using, you may need to set additional values, such as:
AnimatorFloat(xSpeed,0)@0.1;
AnimatorFloat(ySpeed,0)@0.1;
AnimatorBool(Walking,false)@0.1;
AnimatorBool(Running,false)@0.1;
AnimatorPlay(idle)@0.1
(This resets the animator's xSpeed and ySpeed, clears the animator states, and plays the idle animation.)
For more information about how the example scene was set up, see Corgi Integration Example Scene.
- If you're using More Mountains' Inventory Engine, see Inventory Engine.
How to Run Conversations in Corgi
To add a Dialogue System conversation in Corgi:
- Add a ConversationZone component to a GameObject. It will automatically add a BoxCollider2D with the Is Trigger checkbox ticked.
- Add a Conversation Trigger to the same GameObject, and set its Trigger to OnUse.
Then customize the components through the inspector to run a Dialogue System conversation:
| Setting | Description |
| Player Is Actor | If ticked, automatically finds the spawned player and uses it as the conversation's actor. |
| Can Move While Talking | If ticked, the player can move while the conversation is active; in this case, you may want to tick the Conversation Trigger's Stop On Trigger Exit checkbox. |
| Corgi Controls Camera While Talking | If ticked, Corgi retains camera control; in this case, you can't use Zoom2D(). |
Key Navigation Input Setup
For keyboard navigation, first make sure that the first response appears highlighted when running the conversation. (Make sure the dialogue UI's Auto Focus checkbox is ticked.) If it does appear highlighted, check the steps below:
Since Corgi is a complete project it overwrites Unity's default input definitions. The Dialogue System relies on standard Unity UI navigation using an EventSystem. Inspect your scene's EventSystem GameObject, which is usually located under UICamera. Make a note of the Standalone Input Module's Vertical Axis. Then select Edit > Project Settings > Input to view Unity's input definitions. Look for one or more elements that correspond to the Vertical Axis. These will indicate which inputs are already mapped to the Vertical Axis. You can add another element for Vertical Axis that maps the positive and negative values to 'w' and 's' (for WASD) and/or 'up' and 'down' (for the arrow keys).
Corgi Integration Example Scene
These steps were taken to set up the example scene:
- UICamera > EventSystem > inputs were changed to Player1 inputs to let the player press the 'A' button to choose a conversation response. The Fader UI element was also changed to not block raycasts, which would prevent mouse input.
- A Dialogue Manager prefab was added. Dialogue Manager > Canvas > Generic Unity UI Dialogue UI > Auto Focus and Find Actor Overrides were ticked. Find Actor Overrides allows each NPC to use its own world space UI (see 3).
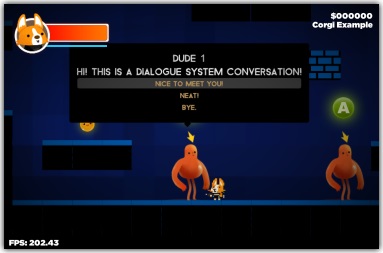
- New NPCs Dude 1 & Dude 2 have an instance of the DialogueUI prefab located in the Prefabs folder. (Dude 1's UI was left active to make it easy to see what it contains.)
- Each NPC also has a ConversationZone script, which works similarly to Corgi's DialogueZone script except it starts a Dialogue System conversation. This script also has options to temporarily disable Corgi's player and/or camera control. Alternatively, you could add a SetComponentEnabledOnDialogueEvent component to the player prefab to disable player control.
- Each NPC also has an OverrideActorName component to override the GameObject name.
- Dude 3 has a slightly different dialogue UI variant.
- Dude 4 (on a higher platform) just barks and doesn't engage in interactive conversations.
Other Notes in Corgi Example Scene
- Dude 1's conversation demonstrates the Zoom2D() sequencer command.
- Dude 3's conversation demonstrates the AnimatorFloat() sequencer command.
<< Third Party Support