This page describes how to set up the Dialogue System with Crosstales' RT-Voice, and optionally with SALSA LipSync Suite using RT-Voice for audio. (RT-Voice is required. SALSA LipSync Suite is optional.)
Follow these steps to set up the Dialogue System with RT-Voice.
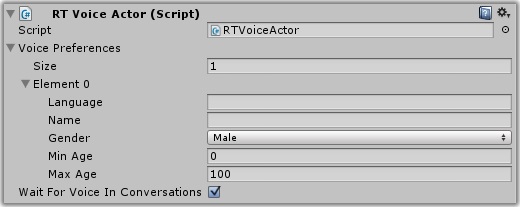
Add an RT Voice Actor component to your characters (Component → Pixel Crushers → Dialogue System → Third Party Support → RT-Voice → RT Voice Actor). This will make the character use RT-Voice whenever it barks or speaks a conversation line.

To use SALSA LipSync Suite:
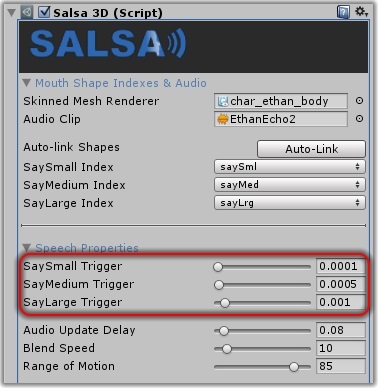
USE_SALSAAdd an RT Voice Actor component. Increase the SALSA trigger values to these ranges:

The Example folder contains an example scene that uses RT-Voice. This is a variation of the main Demo scene. The only difference is that Private Hart and Sergeant Graves have RT Voice Actor components, which makes them automatically speak their lines using RT-Voice instead of the precorded voiceover.
Sergeant Graves also has a Range Trigger that enables his Bark On Idle component only when the player is near him.
The RTVoice SALSA Example folder contains an example scene that demonstrates an RT Voice Actor component on a SALSA actor.
Syntax: RTVoiceWait( [subject] )
Description: Waits for RT-Voice to finish playing on a subject. You normally don't need to include this sequencer command in your sequences because the RT Voice Actor component will add it automatically when playing a conversation or bark line. However, you can add it manually to allow another sequencer command to wait until RT-Voice is done playing, as shown in the example below.
Parameters:
speaker.Example:
RTVoiceWait()->Message(Done); Camera(Closeup,listener)@Message(Done)If you want to generate and save audio files at design time, instead of allowing RT-Voice to generate audio at runtime, you can use the Save Audio utility. Select menu item Tools → Pixel Crushers → Dialogue System → Third Party Support → RT-Voice → Save Audio Files....
Specify a dialogue database and entrytag format. (If the open scene has a Dialogue Manager, the utility will grab this info from it.) Then click Save Files... and select a Resources folder in your project. This will generate audio files named using the entrytag format you specified. Depending on the speed of the audio generation, you may need to reimport the folder to see the files.
You can then use this sequence to play the audio:
AudioWait(entrytag)
Since you'll be playing pre-generated audio files and not asking RT-Voice to generate them at runtime, remove the RT Voice Actor component from your characters.
You can specify voices for each actor by adding any of the custom actor fields below:
| Actor Field | Type | Description |
|---|---|---|
| VoiceName | Text | An available voice name as reported by RT-Voice. Can also add localized versions such as "VoiceName es" for Spanish |
| Gender | Text | "Male" or "Female |
| MinAge | Number | Minimum voice age to use. If MinAge & MaxAge are zero, any age is acceptable |
| MaxAge | Number | Maximum voice age to use. If MinAge & MaxAge are zero, any age is acceptable |
For an example, see the Actors tab in the example scene's database.