 |
|

This page describes how to set up the Dialogue System with Action-RPG Starter Kit and how to use them together. (Action-RPG Starter Kit is required.)
Action-RPG Starter Kit copyright © Hitbear Studio.
UPGRADE NOTE: This support package requires Action-RPG Starter Kit v3.1 or higher.
Follow these steps to set up the Dialogue System with Action-RPG Starter Kit.
The Dialogue System works with the C# version of Action-RPG Starter Kit (ARPG). Build your game using the C# version. This is located in Assets/ActionRPGKit/CSharpExample.
Import the package Third Party Support/Action-RPG Starter Kit Support. This will unpack files into the folder Third Party Support/Action-RPG Starter Kit.
In the first scene that will spawn the PC or will involve the Dialogue System, add a Dialogue Manager.
Most of the setup is done in the player prefab, which is the prefab that's spawned by Player Spawnpoint. You may want to make a copy of an existing ARPG prefab and customize it.
Select the player prefab. Then select menu item Window > Dialogue System > Third Party > Action-RPG Starter Kit > Setup Player Prefab. (Note that this is in the Window menu, not the Component menu.)
This will add several components to your player prefab. Afterward, you will need to customize these components:
Finally, point Player Spawnpoint (in your scene) to your prefab.
You will also need to Setup Death Body Prefab.
To manually reproduce the steps done in the menu item above, follow these instructions.
On the prefab, add these components:
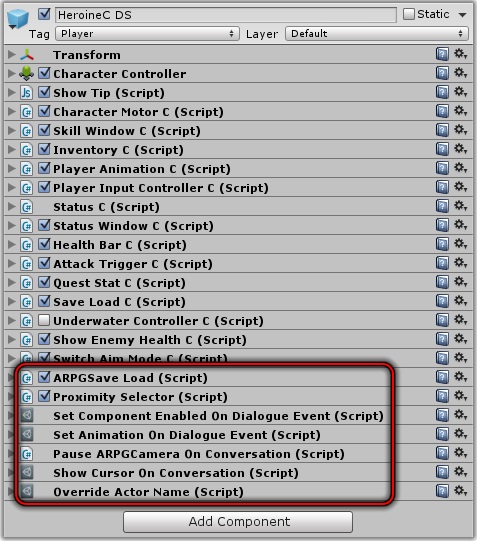
E. You may want to clear the Use Button property or set it to something different.9, and add these components on the prefab to both sections. Set the On Start section to False.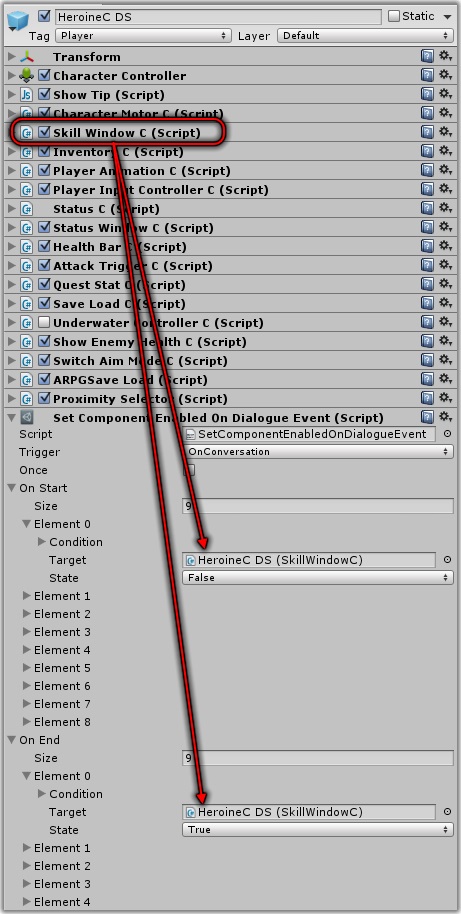
Finally, point Player Spawnpoint (in your scene) to your prefab.
You will also need to Setup Death Body Prefab.
On the player prefab's StatusC component, examine the prefab assigned to Death Body. (In the example scene, the prefab is HeroineDeathC DS.) Replace the death body prefab's GameOverC component with the Dialogue System version, DS GameOverC, and assign your player prefab to the Player property.
On your NPCs, add these components:
Is Trigger ticked.ShopC.cs as described in Import and Setup Files.Vanilla Action-RPG projects use TeleporterC to change scenes. With the Dialogue System, use DSTeleporter instead.
For a new teleporter, select menu item Component > Dialogue System > Third Party > Action-RPG Starter Kit > Teleporter.
For existing teleporters, inspect the TeleporterC component. Drag the DSTeleporter.cs script into the component's Script field.
By default, a teleporter activates when the player enters its trigger collider. If you change Activation Method to OnUse, it will activate when the player presses the Proximity Selector's "Use" key ("E" by default). In this case, add a Usable component to the teleporter to make it usable.
The Example folder contains an example scene. Near the player (behind her and to the left) is an NPC titled "Dialogue". You can run up to the NPC and press E to talk.
The NPC's conversation demonstrates how to access ARPG data (such as player health), add and remove items, manage quests, and open the NPC's shop. You don't have to add quests and a shop to every NPC. This example NPC just has everything so it can demonstrate how they all work together.
The example scene uses the Dialogue System's quest system. At this time, the quest systems provided by ARPG and the Dialogue System are not integrated together. We suggest you choose one quest system – for example, the Dialogue System's Quest System – and design all quests with that system and its associated UI elements.
The player's DS Save Load component works on top of ARPG's SaveLoad component. It presents a simple menu where you can access the quest log and save, load, and quit your game. When saving and loading, it invokes ARPG's SaveLoad component to save ARPG data. On top of this, the DS Save Load component also saves the the Dialogue System data. Like ARPG's SaveLoad component, it saves games to PlayerPrefs. You can use this script as a base to customize if you want to save games elsewhere, such as a local disk file.
The DS Save Load component has a "Quit to Title" menu option. Due to the way ARPG handles cursors, this option leaves the cursor hidden when returning to the title scene. Add a Set Cursor On Start component to your title scene to work around this issue.
The NPC's quest requires the player to kill two goblins. The goblins have Increment On Destroy components that increment a variable in the dialogue database to keep track of how many the player has killed.
During conversations, you can read and write the following Lua fields in your dialogue entry Scripts and Conditions:
| Variable | Description |
|---|---|
Actor["Player"].level | The player's current level |
Actor["Player"].atk | The player's current attack value |
Actor["Player"].def | The player's current defense value |
Actor["Player"].matk | The player's current magic attack value |
Actor["Player"].mdef | The player's current magic defense value |
Actor["Player"].exp | The player's current experience |
Actor["Player"].maxExp | The player's max experience |
Actor["Player"].health | The player's current health |
Actor["Player"].maxHealth | The player's max health |
Actor["Player"].mana | The player's current mana |
Actor["Player"].maxMana | The player's max mana |
Actor["Player"].statusPoint | The player's status points |
Actor["Player"].cash | The player's current cash |
Actor["Player"].Item# | The item ID number associated with item slot # (0-15) |
Actor["Player"].ItemQty# | The quantity of these items in item slot # (0-15) |
Actor["Player"].Equipm# | The item ID number associated with equipment slot # (0-7) |
Actor["Player"].WeaEquip | The item ID of the currently-equipped weapon |
Actor["Player"].ArmoEquip | The item ID of the currently-equipped armor |
Actor["Player"].Skill# | The skill associated with skill slot # (0-2) |
Actor["Player"].SkillList# | The skill value associated with skill list slot # (0-8) |
For example, if the player is talking with an NPC, and the NPC decides to fully heal the player, you could add this to the dialogue entry's Script field:
Actor["Player"].health = Actor["Player"].maxHealth
If your player is named something different in the dialogue database, replace "Player" with the name in the database.
These values are copied into the Dialogue System's Lua environment at the start of the conversation, and are copied back to ARPG at the end of the conversation. If you need the values to take effect in ARPG immediately, use the Lua functions listed below.
During conversations, you can use these Lua functions in your dialogue entry Scripts and Conditions:
| Function | Returns | Description |
|---|---|---|
SetPlayerLevel(#) | (nothing) | Sets the player's current level |
SetPlayerAtk(#) | (nothing) | Sets the player's current attack value |
SetPlayerDef(#) | (nothing) | Sets the player's current defense value |
SetPlayerMAtk(#) | (nothing) | Sets the player's current magic attack value |
SetPlayerMDef(#) | (nothing) | Sets the player's current magic defense value |
SetPlayerExp(#) | (nothing) | Sets the player's current experience |
AdjustPlayerExp(#) | (nothing) | Increments the player's current experience (e.g., AdjustPlayerExp(50) to grant 50 experience) |
SetPlayerMaxExp(#) | (nothing) | Sets the player's max experience |
SetPlayerHealth(#) | (nothing) | Sets the player's current health |
SetPlayerMaxHealth(#) | (nothing) | Sets the player's max health |
SetPlayerMana(#) | (nothing) | Sets the player's current mana |
SetPlayerMaxMana(#) | (nothing) | Sets the player's max mana |
SetPlayerStatusPoint(#) | (nothing) | Sets the player's status points |
GetItemCount(id) | Number | Returns the number of items with the specified item ID. Item IDs are defined in ARPG item prefab ItemC components |
AddItem(id, quantity) | (nothing) | Gives the player a quantity of items with the specified item ID |
RemoveItem(id, quantity) | (nothing) | Removes a quantity of items from the player |
HasEquipment(id) | Boolean | Returns true if the player has an equipment item; otherwise false |
AddEquipment(id) | (nothing) | Gives the player an equipment item |
RemoveEquipment(id) | (nothing) | Removes an equipment item from the player, even if it's currently equipped |
You can use the following sequencer commands in your dialogue entries' Sequence fields to interface with ARPG.
Syntax: ARPGAdjustHealth(subject, amount, element)
Description: Adjusts the health of any character that has an ARPG StatusC component.
Parameters:
speaker999990 (none)Example:
ARPGAdjustHealth() (Heal the speaker for 99999 points)ARPGAdjustHealth(Lord Voldemort, -125, 1) (Inflict 125 damage of element type #1 on the GameObject named "Lord Voldemort")Syntax:ARPGOpenShop(subject)
Description: Opens the shop of any character that has an ARPG ShopC component.
Parameters:
speakerExample:
ARPGOpenShop(listener) (Open the shop of the dialogue entry's listener)Syntax:ARPGLoadLevel(levelName, spawnPointName)
Description: This is a variation of the LoadLevel() sequencer command that works with ARPG. This command changes levels with full Dialogue System data persistence.
Parameters:
Example:
ARPGLoadLevel(Scene2, Spawn From Scene1) (Teleport to "Spawn From Scene1" in the level "Scene2")More info: Sequences