 |
|
(Click Here for Camera Angle Tutorial)
The sequencer will use the camera specified in the Dialogue Manager's Display Settings. If no camera is specified, the sequencer will borrow the current main camera and restore its position when the sequence is done. However, by specifying a sequencer command in the Dialogue Manager's Display Settings, you can use a separate camera with different post-processing effects from your main gameplay camera – for example, adding a strong depth of field to focus on the conversants and blur out the background.
IMPORTANT: If you use a separate sequencer camera (or cameras), you must set their Tags to MainCamera.
If the Dialogue Manager's Sequencer Camera is unassigned, it will borrow the camera that Unity identifies as Camera.main – that is, a camera whose tag is "MainCamera". Make sure to disable any external control of this camera during sequences or conversations so the sequence doesn't fight for control.
If the Dialogue Manager's Sequencer Camera is assigned, the sequencer will instantiate a copy of the camera and temporarily deactivate the original. When the sequence or conversation is done, it will destroy the copy and reactivate the original if it was active before the sequence started. If it was inactive before the sequence, the sequencer will leave it inactive.
If you have a different sequencer camera in each scene, it's easiest to let the sequencer find it automatically by tagging it "MainCamera". Otherwise you can write a short script to manually assign the Dialogue Manager's Sequencer Camera field. For example, you can attach this to your scene-specific sequencer cameras:
The Dialogue System will only use the sequencer camera if the sequence contains any camera control commands. (You might want to have an in-game cutscene sequence happening the background while the player is free to continue playing. In this case, you probably don't want to switch to the sequencer camera.) If your sequence doesn't contain any camera control commands, you can manually switch to the sequencer camera anyway by adding the sequencer command: Camera(original)
The sequencer command Camera() moves the sequencer camera to angles specified in a prefab called the "camera angle prefab". This prefab is set in the Dialogue Manager's Display Settings. (The camera angle prefab can actually be a GameObject in the scene, but a prefab is usually more convenient.) If you haven't assigned a camera angle prefab, the Dialogue Manager uses a default prefab located in Resources/Camera Angles.
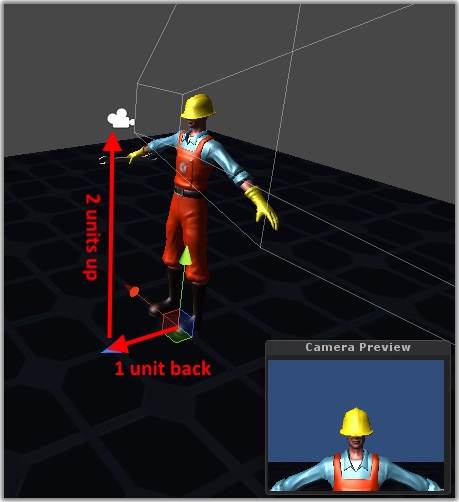
The camera angle prefab is a hierarchy of GameObjects. Each child represents a camera angle defined by its relative position from the root GameObject. For example, if the child's position is 2 units back from the root GameObject, the camera will be placed 2 units back from its subject.
The simple camera angle hierarchy described below defines three camera angles (Closeup, Medium, and Full) progressively further from the subject.
Example:
When you use the Camera( x ) command in a sequence, it first checks the camera angle prefab. If it finds a child whose name matches x, it uses the offset of that child object from the camera angle prefab. It then places the camera at the same offset from the character.
Example: The default camera angle prefab has a child named Closeup that's approximately 2 units up and 1 unit back. The sequencer command Camera(Closeup) moves the camera approximately 2 units up and 1 unit back from the character, as shown below:
The default camera angle prefab has another child named "Medium" that's 2 units up and 2 units back, which places the camera a little farther back from the character.
To add a camera angle to point at a seated character, you might add another child object that's only 1 unit up and 2 units back.
If the Dialogue System doesn't find a matching child in the camera angles prefab, it looks for a GameObject named x in the scene. If it finds one, it uses it as an absolute camera position. It moves the camera to the exact same position and rotation as this GameObject. You can add empty GameObjects to the scene that specify absolute camera positions. The Feature Demo uses three of these. In the Feature Demo, they're organized under the Dialogue Manager object, but they can be anywhere in your scene hierarchy.
The default camera angle prefab contains these angles:
| Angle | Description |
|---|---|
Closeup | Front-on head shot |
Closeup Back | Back of head |
Closeup Left | Left side of head |
Closeup Right | Right side of head |
Medium | Head and torso |
Medium Back | Back of head and torso |
Medium Left | Left side of head and torso |
Medium Right | Right side of head and torso |
Full | Front-on body |
Full Back | Back of body |
Full Left | Left side of body |
Full Right | Right side of body |
Wide | Body with space (farther than Medium shots) |
OTS Left | Over the left shoulder |
OTS Right | Over the right shoulder |
Down | Looking down on the subject |
Up | Looking up at the subject |
You can use the Camera Angle Editor to help you create camera angle prefabs.
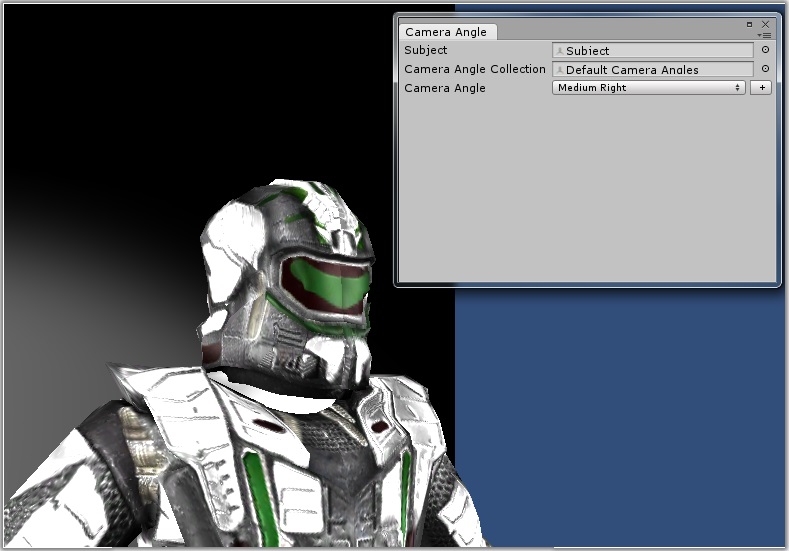
To use the Camera Angle Editor:
Prefabs/Camera Angles/Resources or create your own from scratch. If you assign a prefab, you can only edit existing angles. To add new angles, you'll have to click the button to instantiate a scene object of the prefab.Remember to save your new camera angle collection as a prefab or scene object so you can assign it to your Dialogue Manager's Display Settings.
<< Sequencer Command Reference | How to Add Sequences to Conversations >>