Script reference: PixelCrushers.DialogueSystem.DaikonForgeGUI.DaikonForgeDialogueUI
The Daikon Forge Dialogue UI works in much the same manner as the Unity Dialogue UI. The major difference is that you create your UI layout using Daikon Forge GUI's tools rather than creating Unity GUI controls.
You can assign the Dialogue UI in the Dialogue Manager's Dialogue Manager Display Settings from the prefabs in the Daikon Forge UI Prefabs folder.
You can also add an instance of a prefab to your scene and customize it further using Daikon Forge GUI's tools.
If you do customize a prefab, assign the instance in the scene to the Dialogue Manager's display settings, or save it as another prefab.
To create your own layout:
- Create a GameObject with a Daikon Forge Dialogue UI component by selecting the menu item Window > Dialogue System > Components > UI > Daikon Forge GUI > Dialogue UI.
- Create your Daikon Forge interface as a child of the Daikon Forge Dialogue UI GameObject – that is, place a Df GUIManager (UI Root) directly underneath the GameObject.
- Assign a Daikon Forge Response Button component (Window > Dialogue System > Components > UI > Daikon Forge GUI > Response Button) to each response button.
- In the Daikon Forge Dialogue UI component, assign the UI control properties. At a minimum, you must assign these controls:
- Df GUIManager
- Dialogue Panel
- NPC Subtitle Line or NPC Subtitle Rich Text Line (rich text takes precedence)
- PC Subtitle Line or PC Subtitle Rich Text Line (if you will be showing PC subtitles)
- One or more Response Menu Buttons
- Alert Line
- If you add a dfTweenFloat to the Alert Panel (or Alert Line if you don't use a panel) and set the property to "Opacity", the UI will automatically fade the alert in and out when displaying.
- If you're going to require the player to choose a response before a timer runs out, also add a dfProgressBar for the timer control, and set the timer property in the Dialogue Manager's Dialogue Manager Display Settings.
- Alerts can have, in addition to the alert line, an optional parent panel that can contain any other controls that you want to show, including an optional continue/close button. If you add a panel or continue button, make sure to add them to the corresponding DaikonForgeDialogueUI properties.
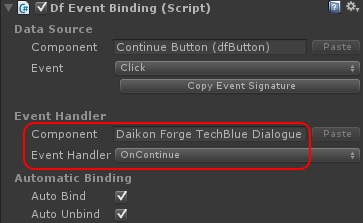
- If you want to add continue buttons to require the player to click past subtitles and/or alert messages, use the same steps as for Unity UI Continue Button. Add a dfEventBinding to the button, and point the Event Handler to the dialogue UI's OnContinue method:
Text Field UI
If you want to prompt the player for text input during conversations, you need to create a GameObject containing a component that implements ITextFieldUI, such as UnityTextFieldUI.
This object should be active in the scene, although child objects needn't be active. If you use UnityTextFieldUI, you should add and assign child objects for the text field and, optionally, a label. You can also add buttons to accept and/or cancel the input. These should send "OnAccept" or "OnCancel" messages to the UnityTextFieldUI object.
See the example scene in Examples/Feature Demo/Text Input Example.
You can find a template for implementing your own ITextFieldUI in Scripts/Templates.
DF-GUI Text Field UI
See the example scene in Third Party Support/Daikon Forge/Examples/Feature Demo Using Daikon Forge GUI With Text Input.
When building your own TextField UI, follow the GUI structure of the example Text Field UI GameObject. In particular:
- Add a DaikonForgeTextFieldUI component to your Text Field UI GameObject.
- The TextBox and/or accept button must notify the Text Field UI GameObject with the method DaikonForgeTextFieldUI/AcceptTextInput.
<< Daikon Forge GUI